
It is Tuesday night as I'm writing this, and I just got back from quilt guild and we had the most awesome program. Ever.
The presentor was Al Hunt, our local Bernina technician--but hold on! This isn't just about those machines. He is also trained on nearly all the main brands of machines. Not only is he a technician, but he also teaches other technicians and dealers at Bernina University. He really knows his stuff and is a great presenter.
He shared with us exactly how a machine makes a stitch. The only essential parts for the process are the needle, the thread, the hook (down by the bobbin) and the takeup lever. (The takeup lever is the "arm" that goes up and down by the tension disks. The thread is threaded through it. On a side note, I have been hit in the forehead by it more than once while I was trying to get close enough to see something, and it really stings!)
The sewing stitch begins with the takeup lever in the highest position it can go. As the stitch begins, the lever descends as the needle begins to lower and pierce the fabric. As the lever descends, it plays out the thread necessary for the stitch to occur. The needle and lever get to their lowest point in the stitch.
(Al had a giant sewing machine needle and a thick cord that he was using as a visual aid. I used this bodkin-thingy as a sewing machine needle. Just pretend it looks more like one)

So in this photo above, my hand is acting as the fabric, and the needle has reached its lowest point in the stitch.
At that time, the needle rises just a bit to produce a loop of thread underneath the fabric.

Al had a term for this, I believe it was "loop lift."
(Can you believe I didn't have a pen for notes or a camera???!!!!)
This loop is VERY important. When it is formed, the hook grabs it, jerks out about 2-3 inches of thread, pulls it around the bobbin, and then the needle and lever rise up again, and the stitch is "set."
The whole stitch process requires about 3-4 inches of thread to run in and out of the needle. You don't really see that happening, but if you want to see an example, thread your machine with light thread, touch a black sharpie to the thread to make a mark at the spot where the thread comes out of your machine and heads to the needle. Then turn the wheel by hand an observe how much that dot goes down through the fabric and back up. If you keep making stitches until the black dot finally appears on the fabric, you will see that you probably (depending on stitch length) made at least 20 stitches, if not more.
Why do we care about that? With that much thread needing to move easily back and forth though the fabric, and not get hung up in the process, the size and type of needle selected becomes VERY important. Do you get as confused as I do about needle sizes and types?
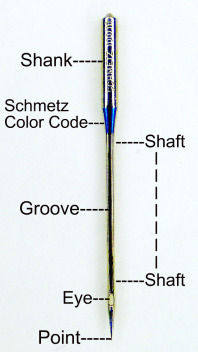
The basic features of a needle are illustrated in the photo. There is a groove that runs down the needle, providing a channel for the thread to travel through. And then there is the eye, which is always somewhat elongated (taller than it is wide), and then the point.
The needle size (70, 80, 90, etc. or else 12, 14, 16, etc.) relates to the thickness of the shaft of the needle and relates also to the size of the groove. So a 100 needle is thicker than an 80 needle, and the groove for the thread is larger. If you are using a very fine thread, you would want the smaller groove. If you are using a coarser, thicker thread, you will want to use a larger needle. If you are in doubt, err on the groove being a bit larger than too small. If it is too small, the thread won't be protected and will tend to shred. Many of us worry that a large needle with make larger holes, and we don't want that, but really, once the quilt or fabric is manipulated, the holes will not remain (unless you are using a fusible or something.)
The point is another consideration. There are three main types, the "sharp" which as it name suggests is very sharp and will pierce through fibers, thread, etc. A"ballpoint" needle is more rounded, and works by pushing between the weave of the fabric, not piercing through it. And finally, the "universal" which is in between the other two. As you sew with the universal, it will go through most things, but also not pierce right through. A ballpoint is usually used with knits, because a sharp will rip holes in knit and the ballpoint also becoming popular with embroidery machiness because it will go down between the threads, and not right into the other thread as a sharp may. Have you ever been free motion quilting and the needle went right through the thread of the previous stitch? Probably you are using a "sharp" needle and the result is that the thread snaps. His recommendation for most sewing is to use a universal. (The exception being knits.) The universal needles are cheaper, too!
Finally we get to the eye of the needle. The eye variations create types of needles like "top stitch", "metallic", etc. In a "top stitch" needle, the eye is quite large. It was designed so that a thicker thread could more easily pass through the eye, but when designed, the needle was used just for topstiching with a thicker thread, and not in a freemotion situtation. The problem with using a needle with too large of an eye is that the loop formed in the "loop lift" will not be as large and pronounced, and much more difficult for the hook to catch. The result is skipped stitches. (This was an "ah ha!"moment for me.) Al shared an example of how he had set up several machines for a class at Bernina University. The instructor replaced all the needles with top stitch needles and as the class got underway, he got an urgent call that the machines were acting up. He got there and found two other technicians, messing with all the adjustments on the machines. Al looked at the needle, replaced them with standard needles, and the machines worked wonderfully.
I have personally attended a class where the instructor was expounding the virtues of the top stitch needle. I was so convinced that I nearly got rid of all my others! Obviously, there is a lot of conflicting information out there. I have been having some problems with skipped stitches, though, so I'm going to start using the standard needles more. (Again, they are cheaper!)
Other tips we learned:
* Al said that if you are using a quality thread and still getting a lot of lint, maybe the eye of the needle is a little too small.
* He also talked about how using feed dogs differs from freemotion. When you use feed dogs, the needle comes down, makes the stitch and then the feed dogs move the fabric. Then the next stitch is made. The important fact is that when the needle enters the fabric, the fabric is stationary. When you freemotion, the fabric is not stationary. When the needle punctures moving fabric, there can be deflection. To help counteract that deflection, he advises using a larger needle. So he recommends a 90 if you are really good with your technique. If you struggle a bit, he suggests a 100.
* The more you have constricting the needle, the larger the groove needs to be to protect the thread. So the more layers you have of fabric/interfacing/batting/piping/other seams, etc., then the larger the needle you need. With few exceptions, the size of the needle determines the size of the groove.
* Changing needles: there are a lot of "rules" out there about how long you should sew with a needle before changing (and throwing it out!!) it to a new one. The paperwork we were given tonight suggests that you change the needle every 4-6 hours of stitching. Al thought this could be a bit conservative. His advice: If you can't remember the last time you changed your neede, go ahead and do so!
I hope you find some of this information to be helpful and that it is understandable. I experienced several "ah ha" moments and found all the information very illuminating. I guess I didn't even know exactly how a machine makes the stitch. Now that I know the basics, I can be more effective in troubleshooting when I'm having a problem (in my case, it is usually skipped stitches.)
Have a great day!
JoAnne
Wow! What a wealth of information! Thank you. I may just print this off for future reference. I know that the type of needle and thread affect performance, but really didn't know the wherefores and whys. Sounds like you had a great program.
ReplyDeleteAwesome information JoAnne! Thank you so much.
ReplyDeleteYeah.....I'm definitely printing this out! What an amazing lecture you heard! And it all makes sense, too! And I know I'm so guilty of using the same dang needle for several projects, 30-50 hours of sewing, before I've changed it.....duh! No wonder I have issues! I read somewhere a while back that they kept their 'regular' project OLD needles for paper piecing......I may just try that now, and change them more often! I guess the thrifty Yankee in me wants to 'use it until it's dead!" But you're right......they're pretty inexpensive......just do it, right! Thanks so much for sharing this!
ReplyDeleteJoAnne,
ReplyDeleteThis was a terrific refresher course for me! Although I'm not a quilter, I've been sewing since I was a young girl. The courses I had in 7th and 8th grade have taken me a long way, but this info and all the other bits you share will help me for all future projects, clothes, etc.
Thanks so much for sharing!!!
I'm learning so much from your blog - and inspiration too - thank you!
ReplyDeleteBH x