Pages

Welcome

Life, Liberty, and the Pursuit of Fabric... Welcome to the Patriotic Quilter where I like to share all things quilty as well as red, white, and blue! Please feel free to look around and enjoy yourself! I would love to hear from you.

Wednesday, July 31, 2013

Dresden Centers

Hi Everyone!

I have now packed approximately 46 potential projects to take to my 4 day retreat.  Alright, I suppose I'm exaggerating a bit, but it doesn't feel like it.  The thing is that I'm obsessing so much with having everything I need for each project that I'm sure I'll do something dumb like forget my machine's foot pedal.  Or my pillow. 

I also worked on my challenge quilt.  I wanted to get it off my table and out of the way.  The plan was to do an applique quilt, but with fusible.  I got the background prepped, stems basted on and traced all the patterns, ironed the fusible to the fabric, cut out all the shapes, carefully arranged them, removed the paper, and fused them in place.  And something didn't look quite right.  I kept looking at the photo of the quilt and then at mine and it seemed like mine was too big or something.  The pattern shapes were, like most magazine patterns, on an insert.  They were all on one part of the folded insert next to a fold.  I opened out the insert and discovered the instructions on the other side that said to "enlarge the pattern pieces by 200%!"  I've never seen any templates in magazines that needed to be enlarged!  Did I mention that I'd already fused everything in place?!  Ugh!  I was able to peel them all off, but the project is being set aside for now.  I'm not sure if it is going to get finished now, either.  I'm not just frustrated by the fact that I made a mistake.  I'm also a bit unhappy about how easy it was to peel off the fused shapes.  This was a new product for me that is supposed to be "the best" and I followed all instructions, I prewashed the fabric and used no softener, and the pieces still came right off. 


Anyway, I want to share with you today how I did the centers of my Dresden plate blocks.  The pattern instructions in the magazine say to use raw edges and an applique glue--so in effect, you trace a circle, cut it out and glue it on.  I want to machine applique instead, so I needed to come up with a way to get a nice, smooth circle.  Have you ever tried to applique circles?  It isn't easy to get a nice circle.  I love the Perfect Circle templates, but I don't have the larger set, so I had to think of another way.

In my other life, I am a scrapbooker.  Okay, to be fair, I think I now have to say that I WAS a scrapbooker since I haven't touched it in nearly 2 years, that I packed away many of my supplies to make room for more quilting stuff, and most importantly--I haven't bought any new supplies in nearly 2 years.  However, I still have (and use) many of the tools.  One of the tools that I really like is my Cricut paper cutter.  It cuts many shapes in different sizes easily.  I used it to cut three different sizes of circles from cardstock for my centers.  I cut at least one for every circle I needed because I wasn't sure I would be able to reuse them.

Here is one of the perfectly cut cardstock circles, these are the finished size of the centers.
 
I then cut circles from my fabric that were an inch or more larger than the cardstock circles.  I look around for something round that is handy and close to the right size.  When I was fussy cutting the medallion fabric for my large centers, I used a blank CD.  The middle of the CD is clear and there is a hole so I could see that the motif was perfectly centered in my circle.  It worked like a charm!
 
 
I then took my cardstock and fabric circles downstairs by the TV.  Whenever I was watching something, I worked on the centers. 

I did a running stitch all the way around the circle near the edge, but not too close.    Then I place the cardstock piece in the center of the fabric (against the wrong side of the fabric) and pulled up the thread, as tight as I could, and knotted it off.

Like so.
 
Next I took them to the ironing board and pressed them with a hot iron both from the back side and the front side.
 
I sprayed them with starch and pressed again on both sides.  Carefully!  You don't want to burn the paper.  Once they are dry again and cool, I clipped some of the stitches and carefully removed the cardstock.

 You can see that the seam allowance has pulled slightly open, so I carefully pressed it down again.  Can you see how the cardstock is wrinkly because the starch got it wet?  That was why I cut one for each center, I wasn't sure how well they would work a second time, but I misplaced one, so I reused an old one, and it worked fine.

The results--perfectly turned, smooth circles!
 
If I didn't have the Cricut, I would have carefully cut circle templates from no-melt template plastic and used them.


I finished appliqueing the 9 small dresdens to the center so now I'm ready to add the borders.  They require 16 medium plates and 16 more small plates.
 
 
I will also share how I'm doing the machine applique.

Have a great day!
JoAnne

Tuesday, July 30, 2013

Dresden Tutorial

Hi Everyone,

I thought I would share the process of make the dresdens in case not everyone is familiar with the process.  I have heard from some people who tried making them in the past but didn't have good results.  I think I tried my first one way back in the 90s and it was rounded on the ends like this photo.
(It was an unmitigated disaster, too, by the way)

 
The problem with doing a rounded one is that you have to turn the curves under for applique--not fun.
 
That's what makes using the ruler, or the templates, for your blades so great--it self-turns making the applique a breeze.  Just watch.

Once you cut all your "blades" they look like this:  a thimble shape. 
 

First thing, press it in half the long way, right sides together.
 

You really will want the crease you just made later in the process
 

Next sew along the wider, top edge.  I like to start with the fold, but it doesn't matter which end you put through the needle first.

Here is my chain back at the ironing board.  Clip them apart.
 

Next you will clip the folded corner to eliminate bulk.

Like this
 
I do quite a few at a time.

Then turn it right side out and gently poke out the corner with a point turner. 


You will have a pile of these after they are turned right-side out.

Next you are going to press the tops flat.  You want to center your seam along the crease.  If you didn't have a crease to help you find the center, you can end up with some wonky blades.

Then you press it flat.

A finished blade!

Next you sew the required amount together.  These are the small ones for my pattern, so I used 14. You can see that it doesn't want to lay flat. 
 

Turn it over so the seams are facing you and then press them around in a circle, either clockwise or counterclockwise.

As you work with it, it will lay flat!  (Even if you doubt it will!)  The seams may pleat a bit at the center, but remember, it will be covered with the center circle.
 
The important thing to notice is that there are no raw edges on the outside of the plate!  Sewing that top seam has turned the edges for you!
 
When I did the largest plates, I appliqued the ring onto the background first, and then went back and covered it with the center circle.  Now that I have to deal with a larger, heavier background (the blocks with the large dresdens are now sewn together,) I decided it would make things easier to applique the centers onto the plates first, so that I have to handle the heavy top less.
 
I'll be back tomorrow to show you how I do the centers.
 
 
Have a great day!
JoAnne


Monday, July 29, 2013

A Monday Update

Hi Everyone,

I feel like I've not been focusing on any particular project and instead have been flighty in my quilting.  I had a few projects to catch up on after our vacation.

 
First off is my version of Nabby's Dowry.  This is Pam Buda's sew along and you can find the details here.  I had completed all the half square triangles and arranged the blocks, but hadn't sewn them together yet.  I got them assembled now so I'm caught up.
 
My Temecula cake stand blocks.  One per day in July.  I've been doing about 4 at a time.  I'll do the last batch today.  These are really fun to make so I've been savoring them all month.  I can't wait to see how they will be set!  If you are interested in this project, you can find the details here.
 
Our guild is also having a Challenge.  I can't remember if I shared about it before.  They had a box of 125 crayons and we reached into a bag and selected three (without seeing the colors.)  We could put one back in and trade for another, but then that was it, we had to use those colors only with one neutral.  Anyway, I've had my fabric and plan for months but haven't started.  So yesterday I worked on that.  I will show it when it looks like something. 
 
And here is an update on the Dresden Doilies. 
 
I'm working on the smallest dresdens.  There are nine here in the center and then 16 more in the "border."  I have the top row of three already appliqued.  The other 6 are still pinned on.
 
I tried using the medallion fabric for the centers, but it was too light. I also tried just the plain background color, too.  I found this other red print that looks "lacey" and I thought it was the best option. 
 
This is where I "eat crow."  Remember how I discussed the pattern directions and the ruler directions and how they didn't seem to match?  I made my large dresdens with 20 blades like the ruler instructions (not 18 like the pattern.)  I didn't think 18 would work.  After I got them all done and appliqued I made my first small one with 20 blades.  It was too big and wouldn't fit in the spot!  Not only that, but the center was too big and looked more like a flower than a dresden plate!  Major crisis.  I decided to use the template in the magazine instead of the ruler and cut out additional pieces and used only 14 as the instructions said.  It can out nice and fit the space!  I thought I would need to recut all the little fan pieces with the template (I had already cut them all with the ruler.)  I was a bit frustrated, so I slept on it.  The next morning, I reread the magazine.  I saw a sentence that said something to the effect that if you use the ruler, you may need to finesse it a bit with pressing.  So I went into my sewing room and removed 6 of the blades from my ring of 20, sewed it back and took it to the ironing board.  It was a bit of a mess and didn't seem like it would lay flat, but as I pressed it carefully, the fullness in the center eased in and it laid flat!  I was sort of amazed!  It turned out looking just like the one I cut with the template.  Lesson learned!  "Follow the directions even if it doesn't seem to make sense!"  I'm also not opposed to admitting when I'm wrong.  I always try to learn from my mistakes.

 
I also spent time precutting for another project.  At the last minute, I'm going to a quilting retreat on Thursday so I'm trying to get organized and have projects lined up to work on for four days.  I predict I will take way too much, but it is better than running out of things to do.
 
I need to get back in there and try to make sense of things and reorganize a bit. 
 
Have a great day!
JoAnne

Thursday, July 25, 2013

Dresden Doilies Center Done

Hi Everyone!

Thank you all for the lovely birthday wishes!  It was a great day at a great place.  Our trip was so great and long enough to see/do what we wanted, but not too long!  We left Saturday morning and arrived back home Wednesday evening. 

When we drove up to the house, I spied a package on my front step.  I wasn't really expecting anything, but was delighted to find some fabric that I had ordered before I left.  (I never dreamed it would arrive so quickly!)  I had ordered some because when I first shared about my Dresden Doilies project, Jennifer at Seams Crazy commented and asked if I had considered using a French General medallion print for the centers.  Wow!  I actually hadn't, and I am such the queen of fussy-cutting that I couldn't believe I hadn't thought of it.  I clicked away and found the perfect fabric AND it was on sale and then waiting for me when I got home from vacation!

Before I left, I had completed all 16 of the large "plates" and had appliqued more than half to the background squares.  Since then, I've been able to get all 16 appliqued along with the center circles, too.


Here is a closeup of the fussy-cut centers:

I love it!  It looks just like a crocheted doily, and this is Dresden Doilies after all!

I still have 16 medium plates and 25 small ones to work on.  I'm loving how this is looking.

Have a great day!
JoAnne

Tuesday, July 23, 2013

It's a Boy!

Niagara Falls were lit up blue last night to celebrate the royal birth.


We are leaving Canada today.  It has been fun, but I'm going to be glad to cross the bridge again so that my phone will work again!  (I'm afraid I didn't realize how much I use it for information, etc.!)

Have a great day!
JoAnne

Monday, July 22, 2013

That's a Lot of Water!

Hi Everyone,

Greetings from Niagara Falls!  We are having a great time.  Yesterday was my birthday and I got to celebrate on the Maid of the Mist.  I have been dreaming of riding it almost since I can remember.  I was so excited when we were getting on that I felt like a kid again!

This is the Maid of the Mist in Horseshoe Falls.  Obviously I wasn't on this one.   But look at the rainbows!  I took this last night.


This is a picture I took when we were in the same position as the boat above!  It was exhilarating and exciting!


Here we are.  My husband doesn't seem likely to trade me in on a new model even if I am a year older!
 
We went on the tram over the whirlpool today!


And then we went "Behind the Falls." 
 
The best is the news that Kate had the baby--a boy!  Hopefully they will light the falls blue tonight as we leave tomorrow.
 
 
Have a great day!
JoAnne
 
PS:  I found my phone charger!  It was just like most of you predicted--just a day after I bought a new one.  I got out of the car at one of our stops and there was a cord hanging off my purse.  It was the missing charger.  It must have been down under a seat or something?  I was thinking it was white, like my phone, but it was black--so I probably saw it when I searched in the car, but didn't recognize it.  

Friday, July 19, 2013

Lincoln and Fellow Compatriots

Hi Everyone,

I'm finally getting to show and tell about my Lincoln Schnibble.  I always read the pattern directions and sometimes read a whole quilt book from cover-to-cover.  You never know what tidbit might be in there.  I particularly enjoy Carrie Nelson's patterns because she always says something about how she names them.  In the case of Lincoln, she mentioned how there are 13 stars and striped blocks and Lincoln seemed to be perfect. 

As I mentioned before, I would have been really happy to make up a nice red, white, and blue patriotic version.  I may still!  However, I got a little hung up on the title.  I went to my stash and began to look through things.  I began thinking of many of our other Presidents--I guess since we had just visited 4  Presidential homes this month, I had them on my mind.  Then I remembered this fabric:


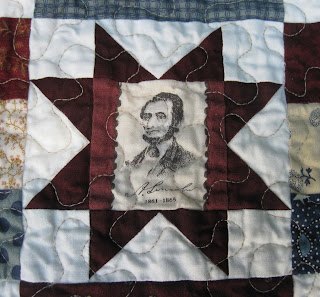
I bought this several years ago.  I fell in love with it.  It is supposed to reproduce the look of the old cigar silks featuring Presidents.  While I really like it, it isn't the easiest fabric to work with.  First of all, the portraits are rectangular.  It is really hard to use rectangles in quilting--especially something that looks traditional.  Second of all, the colors are a bit...  strange.  Some of the backgrounds of the portraits are cheddar, some just cream, some greenish, and even a few pink ones!  The red is a very dark wine.  I just couldn't figure out how to use it.

I considered using it for Lincoln.  I measured the portraits and compared them to the size I would need for the star squares.  My fabric was a bit too big.  I decided that wouldn't be too bad, I could make the blocks slightly larger.  In this case they finish at 5."  What about fabric to go with, though?

I took the fabric to one of my local fabric stores and found some red nearly exactly the same as the background of the portraits.  I got that for the star points.  I decided on a simple cream for the background of the stars.  The solid fabrics really let your eye focus on the portraits and helps the stars stand out.  Those blocks were easy.

The other block in the quilt is a rail fence.  What colors could I use for them?  Red, white, and blue?  I didn't really like anything I was pulling from my stash.  Then I remembered the new line of Historical Blenders Collections for a Cause.


The colors seemed like they would go great, except for the reds, so I got a jelly roll.  I was right!  They went really well with the Presidential fabric.  I pulled all the dark, winey red from my stash and cut strips from them, and then pulled out some blues and backgrounds from the jelly roll (along with a few more from my stash) and made the rail fence blocks.

As I fussy-cut the Presidents, I realized that I had every President up to the 1900s.  There were 24 of them.  Lincoln had 13 star blocks, so not only was I going to make my blocks a little larger, I was also going to have more of them.  I was able to use the same layout as Carrie did in Lincoln, only with more blocks.  The numbers even worked out perfectly!  This is how it came out:

It is really a masculine quilt!  Not only because it is full of men's pictures, either, but also because of the color palette.

Here is Mr. Lincoln himself.
 
 
Here is William Henry Harrison who took a chill during his Inauguration and died of pneumonia just a few weeks later.
 
 
This is James Monroe--the owner of one of the homes we visited in Charlottesville.  He  consistently comes out as one of the best Presidents after the top 5 or so.  I'm not sure what criteria is used, but that was one tidbit we learned from our guide. 
 
This is Grover Cleveland.  He was elected for one term, was defeated after it, and then won the next election, so he served two terms, but not consecutively.  Another interesting fact:  he ordered a baby carriage for the daughter of his good friend Oscar Folsom.  When Oscar died, Cleveland became guardian for the child when she was 11.  When she turned 21, she married Cleveland in the White House.  I believe it is one of a very few marriages by a President while in office.  It's a little creepy, if you ask me.  At 21 she is the youngest ever First Lady.  I'm actually featuring him because he was a very distant cousin of my Great, Great Grandfather--thus making him my cousin as well!


I took it back to my favorite fence for some photos.
 

I'm really pleased with the crisp cream in the background of the star blocks.  I'm afraid if I had used something darker, they would have blended right in to the rail fence blocks and the whole thing would have been a bit muddy. 

We are off on another trip--we are headed to Niagara Falls for a few days.  It is near the top of my bucket list to visit and ride on the Maid of the Mist.  I'm pretty excited.   I'm crossing my fingers that Kate has the royal baby while we are there.  Canada celebrates the birth by lighting the falls either pink or blue---I think it would be fun to be there to see!

Here's a question for you:  If you were the car phone charger that I just bought prior to our trip to North Dakota, and haven't seen since, where would you be?  Please don't say "still in the rental car in North Dakota!"

Have a great day!
JoAnne

Thursday, July 18, 2013

Dresden Doilies Blade Count

Hi Everyone,

Boy was yesterday a fun blog day!  I posted my blog about Dresden Doilies and was surprised to see Thelma's post that she was undertaking the same project.  We emailed back and forth through the day, and that was quite fun.  Anyway, I was intrigued because Thelma's dresden plates had 18 blades as the directions in the magazine stated and mine had 20.  We discussed it a bit and Thelma even emailed Gerri Robinson, the designer of the pattern, to ask.  Gerri returned a very nice email to Thelma, who shared it with me, saying that if you follow the instructions in the magazine, we should be fine.

So I got out my magazine and read the instructions again.  Yes, it said to use 18 blades for each large dresden plate.  Then I noticed where it called for 16 blades for the medium and only 14 for the small ones.  The instructions described using the Easy Dresden Quilt tool, or said that you could also use the "more precise templates" in the pattern section.   The directions for the Easy Dresden ruler say that you need to have 20 blades (or sections) to make a full circle.

Okay, I'm no mathematician, but I did take some geometry and trigonometry in high school and it seems to me that using the same angle of tool (18 degrees if 20 are needed to make a circle since  360 divided by 20 equals 18.)  So no matter what size of blade you cut with that ruler, they will always be the same angle and you will always need 20 of them. 

I decided to compare the ruler with the templates and noticed some differences:

 
This is the first template, for the large dresden plates.  You can see that the ruler does not align with the template.  The difference is easier to see if you look at the seam allowances.  They meet up well at the top, but there is quite a difference at the bottom.  (Enough to account for the difference between 18 and 20 blades.)


This is the ruler and template for the medium dresden plates.  These two are even more off, accounting for the difference between the template using 16 and the ruler using 20 for the full circle.


And the third picture, for the smallest dresden plates, shows that the ruler and the template are much different.  They template would require only 14 blades for the whole circle and the ruler still requires 20.

So now that I have the discrepancy figured out, I see that I have 2 choices.  I can use the templates and follow what the magazine says, or I can use the ruler and make all the dresdens with 20 blades.  Since I've already gotten most of the large plates complete, I think I'm going to stick with using the ruler.  I don't think that the number of blades or sections in each dresden plate will have a significant difference in the overall look of the quilt.  It will require a bit more work, though, but that will be fine.  I'm just glad to find the solution to a puzzle.

I finished quilting my Lincoln Schnibble yesterday, so I will be binding and washing it today and will show it to you tomorrow!

Have a great day!
JoAnne