

These are the rulers. They come with wonderful instructions about how to achieve your desired finished unit.
The first thing you do is cut the required pieces: this will include the center of the square-in-a-square block, which is cut as a square, and then the corners which are cut as triangles (for me they are of my background fabric.)

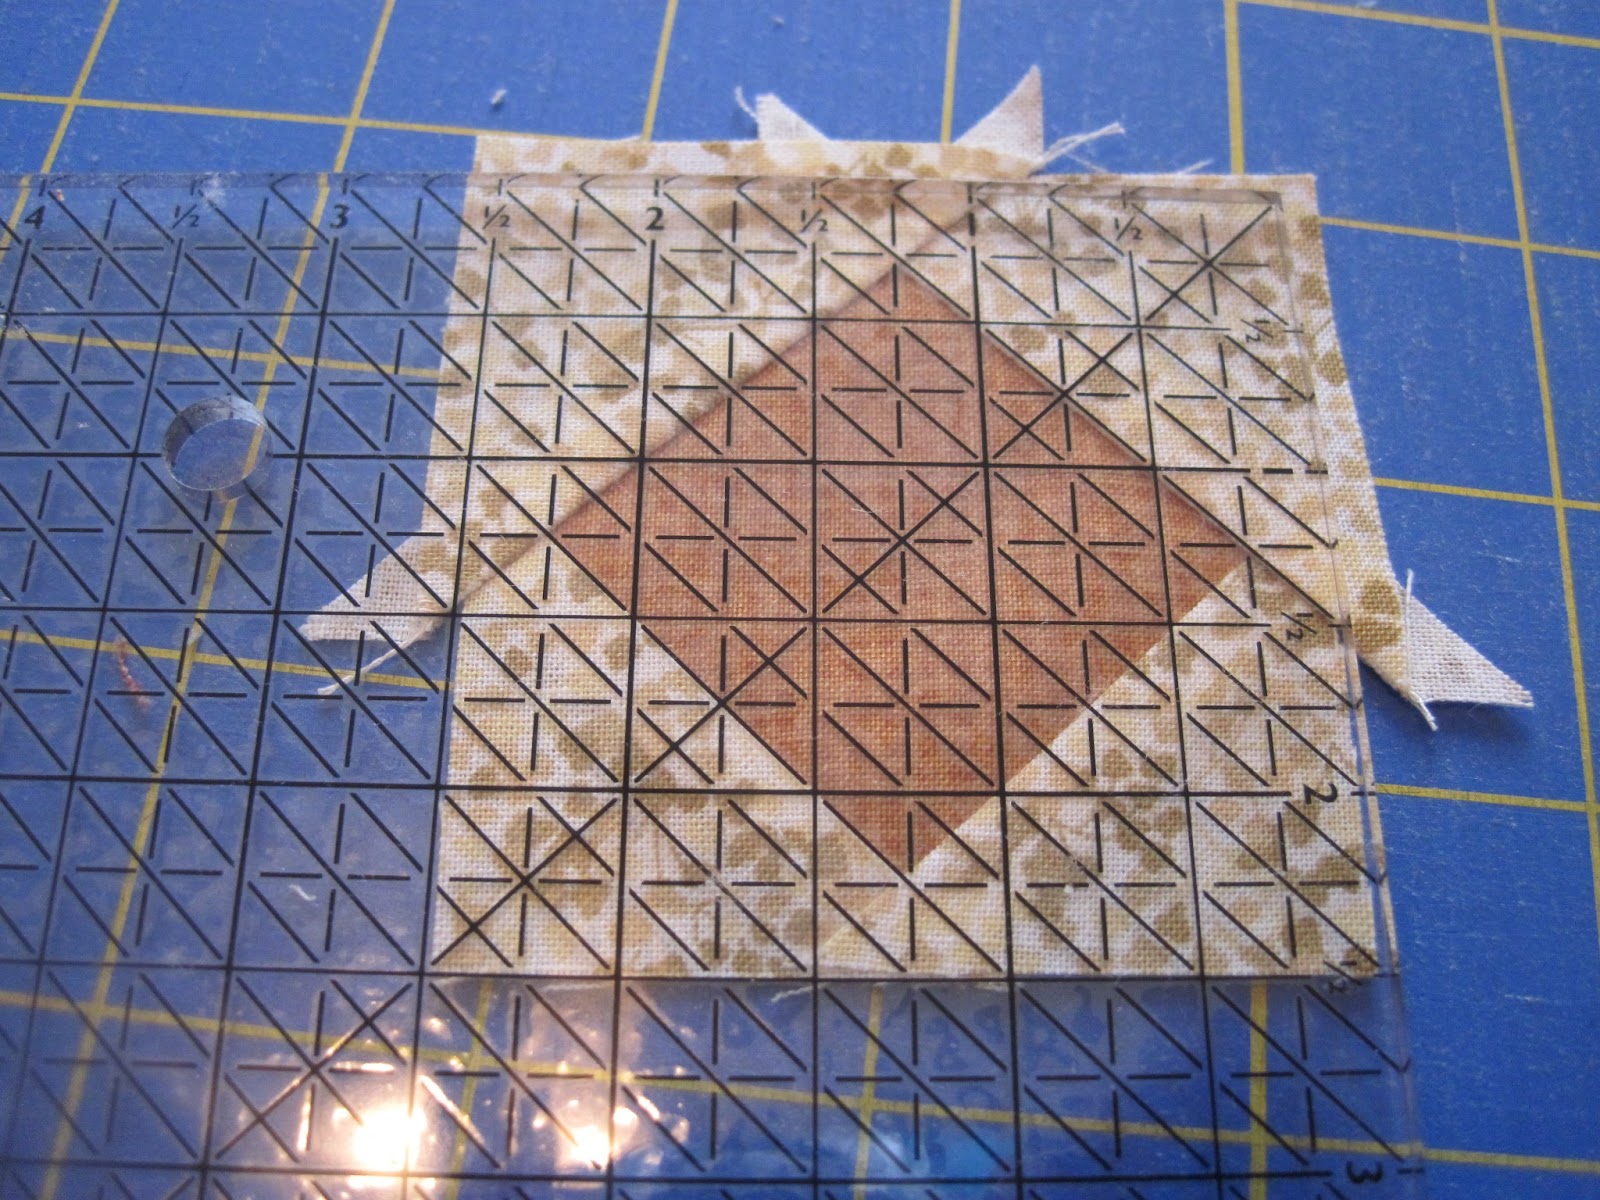
You take the center square and align it with the appropriate size square on the Companion ruler.

Then you trim the corners off. Easy!

Sew one of the corner triangles to one diagonal edge.


Here the seam is stitched, but I used light thread so it is hard to see. Sorry!

Press by setting the seam and then opening the triangle. It is intuitive to press it that way just like when making a flying geese unit. However, when I began piecing everything together for the sashing, I realized that the directions said to press some of them (the middle units--my red ones) toward the square, not the triangle. Oops!

Next add another triangle to the other side.

When it is pressed, you end up with a wonky unit like this. Never fear!

Using the Fit to be Quarter ruler in the set, you line it up at the bottom right corner with the original size of the square that you cut. You can see that one of the diagonal lines will match the right side's diagonal seam.

When it is all aligned, you trim off the side and top with your rotary cutter.

The turn it around to the third edge and trim that, too,

You end up with a nice, square unit again.

Turn it upside down and repeat the process...

...by removing the other two corners

Then sew on the other triangles in the same manner as before

It is easy chain sewing

Press the third corner

Add the fourth

now you have another half true, half wonky block.
Just use the ruler and trim the three sides and
Voila!

A perfect square-in-a-square block!

It takes quite a few steps, and lots of trimming, but the perfect block is so worth it! I've made these the traditional way and no matter how careful I am, they come out a bit wonky or skewed.
I finished all of these and added the top and bottom strips and went on to sewing them together into the sashing strips. However, the points needed to match so I had to pin! I try to avoid pinning at all costs, but it is necessary here for good matches.
It occurred to me that not everyone may know the technique (which is pretty common--it isn't my idea at all, I can't remember when I learned it) that I use to match points. I think it is referred to as "the three pin technique" (or at least it is in my head, ha ha!)

Start by using one pin to match the point. Push the pin from the back of one unit, right at the intersection of the seams of the point

Then continue pushing the pin through the point on the right side of the second unit

Ram both pieces tight together and up to the head of the pin. You want it all tight together so it doesn't shift!

Next you put a second pin as close to one side of the first point as possible, and then use a third pin on the other side.

Remove the first pin.

Sew the pieces together. I leave the pins in and go slow so I don't hit one. (sssh, don't tell the sewing machine police that I sew over pins!) You don't have to, but I want to keep it all from shifting even a tiny bit, and sometimes when you remove a pin, things move.

Or, after you "three pin" several, you can remember that you have those nifty "fork pins" and you can use them instead. With the matching, first pin in place, straddle it with the fork pin!
These points match much better in person than the photo seems to show! Really!!

I had to press this seam open because there was so much bulk where those points met, so that slowed me down a bit, too.

This is a complete pieced sashing! I have several done but need to finish the rest today.
Do you want to see a sneak peek of how all of this is going to come together? I sure did!!!

I can't wait for the rest of the patterns! This is going to be a great quilt!
Have a great day!
JoAnne
Goodness! That is such a unique and great idea! Reading the post this morning with my cuppa tea and I had a "duh" moment about how to treat a UFO that I have been agonizing over ... hope you don't mind if I "borrow" this idea ~ would love to finish up this quilt at an upcoming retreat and think this is the ticket! Thanks for the early "Easter present" LOL Linda
ReplyDeleteGreat tutorial. Sometimes the extra work is worth it, especially when you have so many squares to create.
ReplyDeleteI'm glad you posted a peak at the finished quilt. Love how you are using different colors in your sashing, insted of all the same.
Impressive! I just bought Monique Dillards "fit to be square" on my journeys. Can't wit to give it a go...you make it look easy! Great tutorial! Your quilt is coming together nicely. Every time you post a new blck, I think, "yes, I am going to make that." It is amazing how 2 blocks of the same pattern look so different with different color and value placement. Look forward to the next installment.
ReplyDeleteThanks for the great tip on the rulers and the demo! Definitely something to have on hand when you have to make a bunch o' these square-in-a-square!
ReplyDeleteYour quilt is looking GOOD! The sashing is really going to make it shine!
Awesome tutorial! And that sashing is totally great with those blocks! I love the floating effect, too! I'd not seen those rulers before....thanks for the link! I love square-in-a-square blocks, and make them so often, I think I need those rulers! (Yep, mine are usually a bit wonky!)
ReplyDeleteThis technique seems to get the accuracy needed for machining, I will look out for those rulers now I know what to do with them.
ReplyDeleteOkay, now that I see your sashing I have to get to work on mine, it's very pretty!
ReplyDeleteI'm sure that this will be a lovely quilt! Can't wait to see it finished!
ReplyDeletechris
I use the square squared ruler by Deb Tucker. It's interesting to see a tutorial on another ruler, thanks for posting this.
ReplyDeleteI love square-in-a-square blocks but struggle with them too! I've tried Jodi Barrows "process" and ruler but I like the one you showed--never heard of it! This is only one of the many reasons I love reading blogs: there's always something new to learn--thanks!
ReplyDeleteI have just bought this ruler so thank you for showing how to use it. Have you ever tried using it for square in a square in a square? My brain was trying to nut this out the other day, and it just wasn't working for me.
ReplyDelete