Back a while ago, I was working on my sampler quilt for the bee that I am in and I finished the center.
I proceeded with the border. For it, I needed to fussy-cut some stars.
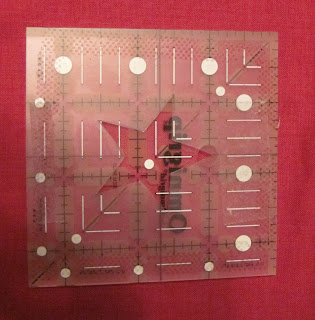
This is the fabulous Jo Morton fabric that have used in several of the other projects that I've shown this summer. I needed to cut squares that are 3.5" with the star centered. To make it easy, I used a 40% coupon to get a 3.5" ruler.I then traced one of the stars from the fabric onto template plastic and cut it out with a craft knife. Then I cut the plastic to 3.5" (centering the star) and taped it to the back of the ruler.
I know that it is hard for you to see, but it was easy to line up the star cut-out with the fabric star. I then just rotary cut around the template. I found out that a bit of double stick tape on the back really helped keep it from sliding around.
Perfectly cut squares! I think when Jo Morton designed this fabric, she had planned for slightly smaller squares to be cut. The problem with this 3.5" size was that when I sewed other pieces to it on the quarter inch seam allowance....
...little bits of other star points remained.
This REALLY bothers me. Like when a lady's bra strap shows. Or like those really, really long, white eyebrow hairs that my husband seems to be growing in. That I pluck. Anyway, regardless of what they remind me of, they had to go!
The border is a bit complicated, so re-sizing it wasn't an option. I also didn't want to sew some of the navy parts of the fabric over the tips--too tedious, wasteful, and bulky. I've heard of many people using markers on their quilts when they need a quick, easy fix, so I decided to try it.
I tried using a black Pigma marker to fill in the undesired points.
As you can see, the marker was too sheer, so it wouldn't work.
So I visited my local craft shop where I found this--and it was even on clearance.
It's navy blue fabric paint.
Here I have painted the right hand corner.
Both of the corners are painted and they are still wet.
When dry, the tips weren't a perfect match, however, it was close enough for me. Much better than before.
Finished and close-up
And from a bit of a distance. I'm really pleased with how it looks.
Come back tomorrow because I'm revealing the finished quilt top!
JoAnne


Birilliant! Have a great day.
ReplyDeleteI concur... brilliant! I love a creative mind at work!
ReplyDeleteYou know NASA is looking for creative problem solvers like you! You amaze me.
ReplyDeleteVery creative with the star template! Great solution!
ReplyDeleteSometimes, you can find a Sharpie marker in the right shade to fill in unwanted white areas. At least I know it works when you accidentaly spill a drop of bleach on your favorite navy shirt. (Ask me how I know!)
Genius---------you solved the problem! I loved the way you cut the star and then taped to your ruler to get the perfect fussy cut.
ReplyDeleteWhat a great idea , problem fixed and it looks gorgeous !!
ReplyDeleteFussy cutting is so cool!! And your fix for the stars was simply genius!! Can't wait to see the finished project.
ReplyDeleteGreat job! I love it when I can figure out a way to solve those kinds of problems and have great results for the effort! Done in the spirit of a real quilter, " use it up, wear it out, make it do, or do without!"
ReplyDeleteYou have some of the best tips and "how to's" in blogland! Thanks for sharing your creative ideas!
ReplyDeleteI learned a lot in this one post! Thanks. : )
ReplyDeleteGreat idea! Thanks for sharing it. I look forward to seeing the whole top.
ReplyDeleteOh I so get the out of place feeling from the white eyebrows on husband! I pluck mine too. Really hurts apparently! I agree, the stars look much better with the other points not on their.
ReplyDelete