Pages

Welcome

Life, Liberty, and the Pursuit of Fabric... Welcome to the Patriotic Quilter where I like to share all things quilty as well as red, white, and blue! Please feel free to look around and enjoy yourself! I would love to hear from you.

Showing posts with label Blogger Girls BOM. Show all posts

Wednesday, December 4, 2013

The Big Announcement

Hi Everyone,

I can now tell you something that has been in the works for a while now.  Do you remember early this year when I was making Monique Dillard's free Block of the Month, The Blogger Girls BOM?


Here it is, in case you forgot.  It was a really fun quilt to make as each month we got a new block pattern and then made it twice, altering the fabric placement to get two completely different looking blocks.

For example, this is one set of blocks.  You can see how different you can make them.


Well, if you follow Monique's blog, you may have read where she announced that she is doing it again, beginning in January.  This time, she asked me to be one of the featured blogger girls!  Nothing like this has ever happened to me before and I was thrilled and pleased that she would ask me!  I thought it over for a few seconds and then agreed. 

This time we are still making a block two ways, but it was up to us Blogger Girls to pick a block and Monique designed the setting.  Also, the blocks are only going to be 6" finished instead of 12."  The finished quilt will be 59" square.  I hope that some of you join in!  I think it will be lots of fun.  If you don't, though, I hope you don't mind reading along.  I'm sure that Monique will be putting out the fabric requirements soon, and when she does, I will share a link. 

While I didn't think anything else could be as exciting and amazing, it turns out that the wonderful Moda Lissa--Lissa Alexander from Moda fabrics, is going to provide some of the fabric.  I get to use the fabric that I've been drooling over for several months now.  It is out in January and is none other than the new Minick and Simpson line, Grant Park!!!  I think it is the prettiest fabric I've seen for ages and I have saved the money I made working the election to buy a fat quarter pack.  I'm not kidding, either.  It was my plan all along, so whenever I dealt with any persnickety people at the polls, (and when my alarm went off at 4 AM that morning) I whispered "Grant Park" to myself. 

I made the this year's version out of fabric that I had on hand (except for the background--the quilt required more than I had on hand) and I loved the result.  This time, using such wonderful fabric, I know this quilt is going to be a stunner. 

Oh, and just a tip:  If you ever get completely excited and text your husband, "OMG!!  I think I'm having a heart attack!  I feel like I just won the quilt lottery!!!"  You may expect an immediate phone call asking if you are okay or need to go to the hospital.  I guess since I'm over 45 now, I need to leave off the whole "heart attack" thing.  But really--while I wasn't exactly jumping up and down, I was doing a lot of bouncing around.  I was so wound up that I couldn't settle to doing too much, so I began making a few more of Lori Holt's portable design boards.  I love them!  You can find the tutorial here or watch a video here

Have a great day!
JoAnne

Tuesday, June 4, 2013

Blogger Girls Block of the Month. Completed!

Hi Everyone!

I am so excited that I was able to finish up my Blogger Girls Block of the Month quilt this week!  As you may know, I've been working on this project since January.  It is designed by Monique Dillard at Open Gate Quilts.  She has the patterns on her website for free for just another month, so if you are at all interested in this project, hurry over to get the patterns.

Also, if you remember, the idea was that one different block pattern would be available each month for a total of six.  You can make it once for a small quilt, or the other idea was to make a second block--altering fabric value/color placement to yield a second block that looks much different from the first.  This was the "draw" that got me to do the project.  I found it really fun to see how much I could change the block.

Here are June's blocks.  I think this was my favorite one of all six.

 
This is the first one I did.


And this is the second one.
 
 
Luckily I had done the sashings  already.  I find that the odds are better that I finish a project if I can do so while I'm still "excited" about it.  As soon as the excitement wanes, the project languishes.  So all I had to do was lay out the blocks, add the sashings, and start assembling.  Then I sewed on the borders and it was done!


It was hard to get a good photo.  The sun tended to wash it out.  We had lots of rain the day before, so I had to be careful not to get it in the mud outside.  Here is a photo from inside of the border detail:

Now you can tell that my border was the focus fabric that I used in many of the blocks.  It was a really fun inspiration fabric and I had great fun fussy-cutting it for some of the blocks.

When I finished, my sewing room was a total mess, so I spent a few hours putting away fabric, sweeping the floor, etc.  I even got everything off my cutting table and scrubbed it.  It is lovely to have a "clean slate" to begin to mess up again!

Don't expect another finished quilt tomorrow!  I haven't begun anything new yet, and right now I'm not sure what the next patriotic project is going to be--I have several ideas, though.

Have a great day!
JoAnne

Tuesday, May 21, 2013

Blogger Girls BOM

Hi Everyone,

I can't believe it is already the 21st of May.  At the beginning of the month I was busy, so I put off making this month's blocks for the BOM, so I tackled them yesterday.  There is only one more month left!  It will be fun to have the quilt all together, but it will be sort of sad to be finished.  I'm having lots of fun making these blocks.

In case you aren't familiar with the program, it is free and by Monique Dillard of Open Gate Quilts.  You can find the details here.  The idea is that you can make two of the same blocks, but alter color placement in order to get two very different blocks from the same pattern.

Here are this month's blocks.  I found them more difficult to "change" than some of the others.

In the first block, I always use my focus fabric, usually "fussy cutting" it.  The focus is the stencil-like fabric with the motifs.  Don't worry, this is an example of poor photography (for some reason) and not poor quilting.  I cut the tips of those points off while taking the picture and I didn't notice it until I put everything away!

Here is my second block.

I must add here that once I got the components (flying geese, square in a square, etc.) completed, these took a little altering.  In the top one, I initially had a red square in the center (Instead of the roosters) and it was way too much red.  On this second block, I had the centers all green for a while, but then decided that a variety of colors might be better, and I do like the look. 

I also have the center of my Bee Sampler quilt done.  All it needs are the borders. 
I had begun this project with Thimbleberries fabrics, but fell out of love.  The problem I had in selecting fabric was that in the original pattern, there was a butterfly block on the left side, and a tulip block on the top left.  Our bee leader decided to substitute the Buggy Barn's buggy wheel pattern for the tulips, and then suggested a substitute for the area where I put the flag.  Well, once I realized we could switch things out a bit, and I knew one area was long and skinny--I knew I would put a flag in there.  It was easy to take out the butterfly block and make the whole thing patriotic!  It came together really quick after that.
 
 
My next challenge is the outer border.  The design features some little pieced flowers, but thanks to my lessons in the Blogger Girls BOM, I'm thinking I can alter placements so it doesn't look flowery.
 
 
I hope all of you are safe from the horrible weather!  My prayers are going to those in Oklahoma.
 
JoAnne
 

Tuesday, April 2, 2013

Vintage Schnibble and Blogger Girls BOM

Hi Everyone,

Boy was yesterday an exciting day.  First of all, theApril block pattern for the Blogger Girls Block of the Month was posted.  I know I have mentioned it a lot the past week or two, but just in case you don't know, it is a free BOM being offered by Monique Dillard at Open Gate Quilts.  You can read about it here.  If you aren't interested now, but are considering it, the patterns are free for a few more months and you can go get them. 

This month's blocks seemed a little bit more "fiddly" than usual, but they were by no means difficult.  It was fun to select the fabrics.  Remember that you can make just one block for a smaller quilt, or you can make two for a larger one.  The idea for the second block is that you manipulate the fabrics so that the second block looks totally different from the first one. 

Here is my first one.  As always, I included a bit of focus fabric in the middle.


Here is the second version.  Sometimes I have the focus fabric in the second one, and sometimes I don't.  I didn't here.  I love how different it looks from the first one!


I spent the morning working on these and then I took a break and read some blogs.  I had just taken a sip of tea as I was reading Thelma over at Cupcakes 'n Daisies when she mentioned my blog!  She is one of the Blogger Girls helping with the BOM and she mentioned that I had made sashing AND she linked back to my tutorial from last week.  Well, I nearly spewed my mouthful of tea onto my computer!  I had no idea she even knew about my blog. 

The next awesome thing was all the comments that I got on the blog yesterday about how I use small quilts!  It was a last minute idea to post and I really just ran around in my pjs taking some quick pictures.  Thanks for your comments!  I really appreciate all of them. 

Finally at around 5:30 or so, came the thing I was waiting all day for.  The new Schnibble was announced!  The new "theme" is going to be Vintage Schnibbles and we will do some of the older patterns.  I have had several people ask what it is all about and here are the details:
Sinta and Sherri have the details at their blogs so you can click on their names and read more about it.  Basically, they announce a Schnibble pattern by Carrie Nelson at Miss Rosie's Pattern Company and everyone makes a version of it during the month.  When you finish prior to the last day of the month, you send a photo and a link to your blog post about it (but a blog is NOT necessary) and they post them on the first of the next month.  It is so much fun to see all the different versions!  Sometimes people alter the pattern and make a runner or make other changes.  I love seeing all the different fabrics and colors used.  Often the participants are put in for a drawing and can win a prize, so that is exciting, too.  The good news is that you can get the pattern at Carrie's website here as a PFD that is instantly delivered via email (or you can get a paper version and wait for the mail) so you all could join in. 

The pattern for this month is Hat Trick

Image of Hat Trick PDF ~ No. 411

I love nine-patch so this is going to be fun!  The patterns are designed to use charm packs (each one usually requires 2 packs) however, by no means do you have to use them.  You can use fabric from your stash--they don't take much!  The finished size is 26" x 32" so they are quick to make, easy to quilt, and a great size for the wall or even for baby quilts.

Whew, it was an exciting day!  I didn't even fall for any April Fool's jokes.  (I hope.)  I hope you all have a great day today.  I'm going to look over my fabric (again) for Hat Trick.  I've already "made up my mind" twice now on what to use.  I'm going to have to make a final decision!

JoAnne

Friday, March 29, 2013

Sashing Complete (Almost)

I set about making the next units for my sashing and I took photos to show you the steps.  The technique uses Monique Dillard's Fit to Be Quarter and Companion rulers.  If you are interested, you can find them here.

These are the rulers.  They come with wonderful instructions about how to achieve your desired finished unit.

The first thing you do is cut the required pieces:  this will include the center of the square-in-a-square block, which is cut as a square, and then the corners which are cut as triangles (for me they are of my background fabric.)

You take the center square and align it with the appropriate size square on the Companion ruler.
 

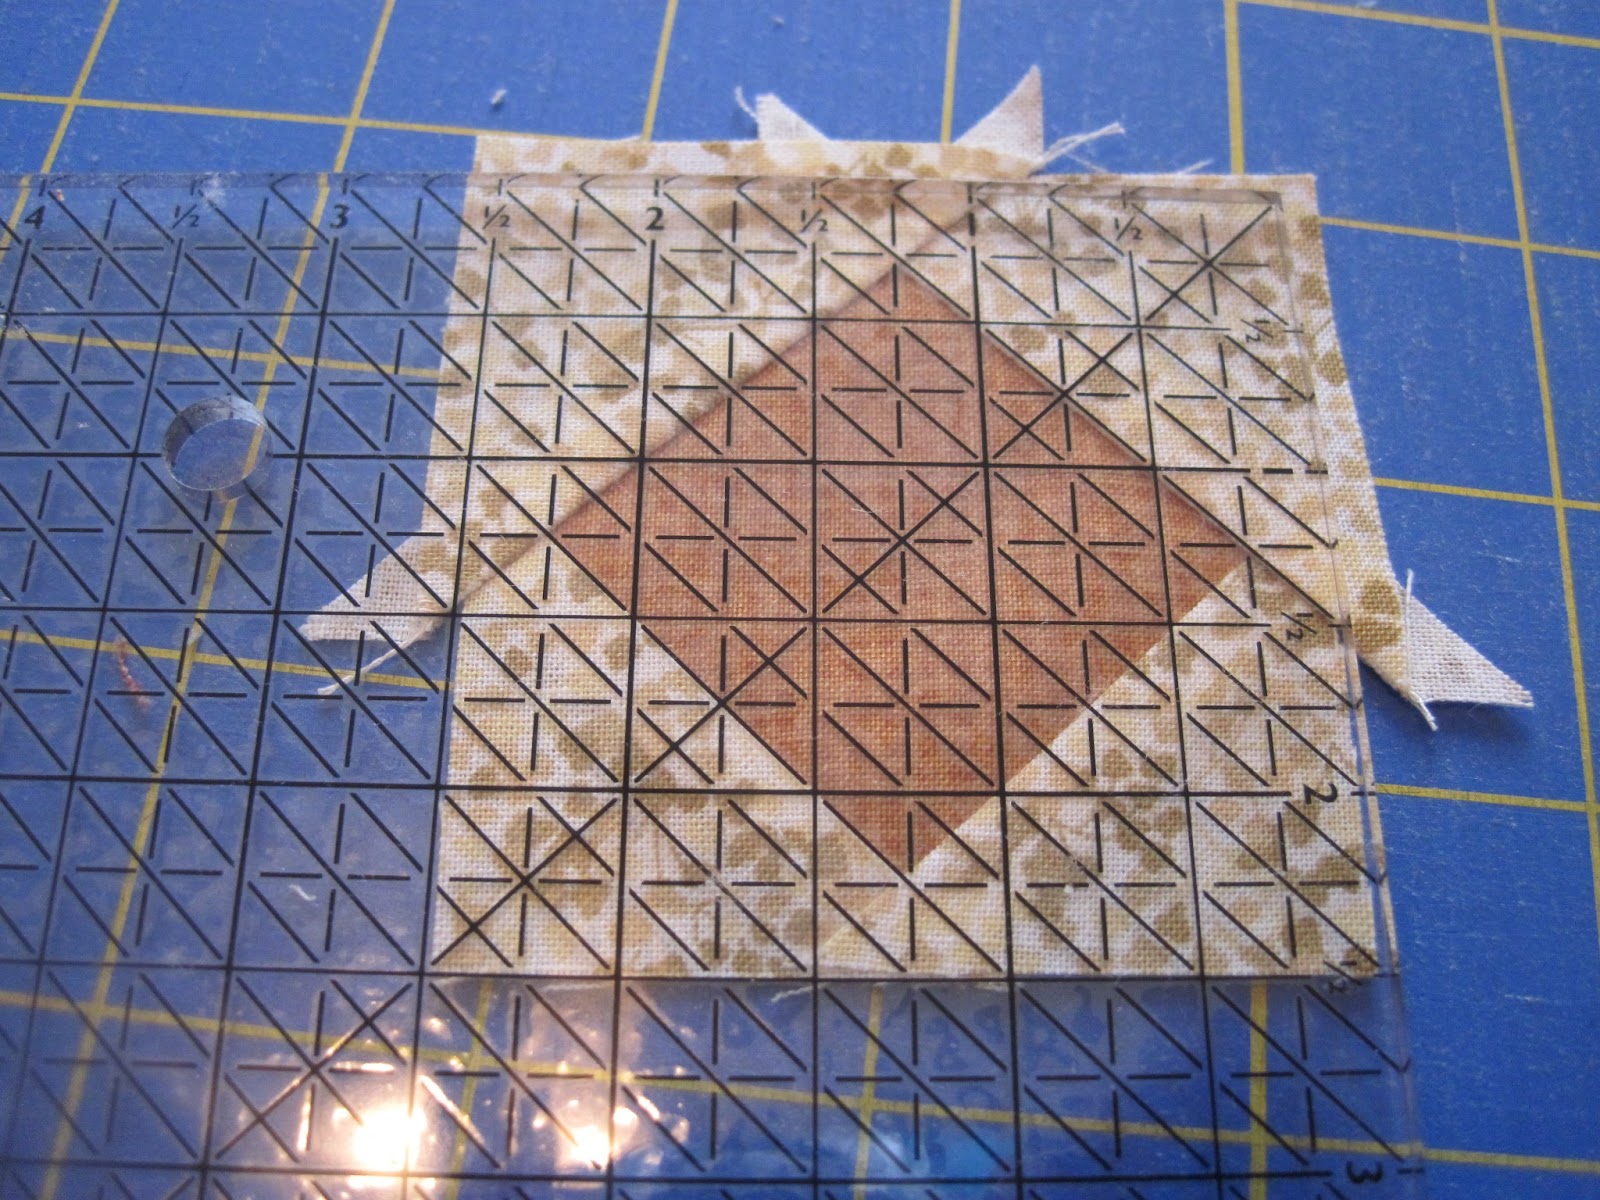
Then you trim the corners off.  Easy!
 
 
Sew one of the corner triangles to one diagonal edge.
 
  You can see that the triangle is larger than what would be required.  This is so that it can be "squared up" later for a perfect unit.  It also means easy sewing as you don't have to be absolutely exact!

 
Here the seam is stitched, but I used light thread so it is hard to see.  Sorry!
 
Press by setting the seam and then opening the triangle.  It is intuitive to press it that way just like when making a flying geese unit.  However, when I began piecing everything together for the sashing, I realized that the directions said to press some of them (the middle units--my red ones) toward the square, not the triangle. Oops!

Next add another triangle to the other side.
 
When it is pressed, you end up with a wonky unit like this.  Never fear!

Using the Fit to be Quarter ruler in the set, you line it up at the bottom right corner with the original size of the square that you cut.  You can see that one of the diagonal lines will match the right side's diagonal seam.

When it is all aligned, you trim off the side and top with your rotary cutter.

The turn it around to the third edge and trim that, too,
 
 
You end up with a nice, square unit again.
 
Turn it upside down and repeat the process...

...by removing the other two corners
 
Then sew on the other triangles in the same manner as before
 
 
It is easy chain sewing

Press the third corner
 
Add the fourth
 

now you have another half true, half wonky block.
 
Just use the ruler and trim the three sides and
 
Voila! 
 
A perfect square-in-a-square block!


It takes quite a few steps, and lots of trimming, but the perfect block is so worth it!  I've made these the traditional way and no matter how careful I am, they come out a bit wonky or skewed.
 
I finished all of these and added the top and bottom strips and went on to sewing them together into the sashing strips.  However, the points needed to match so I had to pin!  I try to avoid pinning at all costs, but it is necessary here for good matches.
 
It occurred to me that not everyone may know the technique (which is pretty common--it isn't my idea at all, I can't remember when I learned it) that I use to match points.  I think it is referred to as "the three pin technique" (or at least it is in my head, ha ha!)
 
Start by using one pin to match the point.  Push the pin from the back of one unit, right at the intersection of the seams of the point
 
 
Then continue pushing the pin through the point on the right side of the second unit
 
 
Ram both pieces tight together and up to the head of the pin.  You want it all tight together so it doesn't shift!


Next you put a second pin as close to one side of the first point as possible, and then use a third pin on the other side. 

 
Remove the first pin. 

Sew the pieces together.  I leave the pins in and go slow so I don't hit one.  (sssh, don't tell the sewing machine police that I sew over pins!)  You don't have to, but I want to keep it all from shifting even a tiny bit, and sometimes when you remove a pin, things move.
 
Or, after you "three pin" several, you can remember that you have those nifty "fork pins" and you can use them instead.  With the matching, first pin in place, straddle it with the fork pin!
 
 
These points match much better in person than the photo seems to show!  Really!!
I had to press this seam open because there was so much bulk where those points met, so that slowed me down a bit, too.
 
This is a complete pieced sashing!  I have several done but need to finish the rest today.
 
 
Do you want to see a sneak peek of how all of this is going to come together?  I sure did!!!


 I think all this work on the pieced sashing is totally worth it!  Look how it "floats" the blocks!!!


I can't wait for the rest of the patterns!  This is going to be a great quilt!
 
Have a great day!
 
JoAnne


Thursday, March 28, 2013

More Sashing

Hi Everyone,

I spent all of yesterday afternoon making another unit for the Blogger Girls BOM sashing.  I've mentioned it in passing the past two days.  It is a free Block of the Month by Monique Dillard of Open Gate Quilts.  If you are interested, you can find all the instructions that we have so far here.  We make one or two blocks each month for six months.  I'm making two, so I will have 12 blocks when completed.  We have half the block patterns so far, and a week or two ago, Monique released the finishing instructions so I'm working on the sashing so that I can have it done when the blocks are all done.  This is proving to be a good plan because this pieced sashing is taking quite a while to do.

This is what we need:

As you can see, we are making many square in a square blocks.  Monique has the coolest rulers that yield the most perfect square in a square, however, it requires "squaring up."  I will take pictures of the steps today when I work on the final unit.

So far, I have the top "G" units completed.  There are 20 of them and they are the corner stones.  I did them on Tuesday.

I spent all yesterday working on the "H" units of the sashing.  We need 31 sashing units, so I had to make 62 of the "H's."  Today I will work on the "I's" and hopefully can get all of them done as well as assemble the sashings.

 
The blue units are the corner stones and the red units are the "G's."


This is the back of the red.  You can see how the rulers/technique really make for a perfect block.

I'm off to work on the next step!

Have a great day!
JoAnne

Monday, March 4, 2013

Blogger Girls BOM for March

Hi Everyone!

I'm back and finally feeling almost as good as ever--still a lingering cough, but I'm off the medications which somehow make me feel worse than the cold symptoms. 

Since Friday was March 1st, the next installment in the Blogger Girls Block of the Month was released.  I'm really having fun doing the blocks.  You can do the block as it was shown,  and you can also do another of the same block but alter the value/color placements to acheive a second block that looks quite different from the first.  Monique Dillard is the awesome creator of this program, it is Free, and also you get a chance to play with her ingenious rulers.  This month featured her rulers that enable one to get a perfect, non-wonky, square in a square block.


We used five of them to make this block.  It is a really versatile, fun design!  The other aspect of this BOM that is keeping me so entertained is the focus fabric that I chose.  I'm having a great time fussy-cutting different motifs for the block construction.


And here is the other version of the same block.  This time I wanted to capture that churn-dash shape, so I highlighted it in red. 

Here are all six blocks that I've made so far.  There will be three more months, and it isn't too late for any of you to join in!


Have a great day!
JoAnne