Pages

Welcome

Life, Liberty, and the Pursuit of Fabric... Welcome to the Patriotic Quilter where I like to share all things quilty as well as red, white, and blue! Please feel free to look around and enjoy yourself! I would love to hear from you.

Showing posts with label Tutorial. Show all posts

Tuesday, September 3, 2013

How To Do A Scalloped Border

Hi Everyone,

Today I'm giving my tutorial on how to make a scalloped border for your quilt.  This is going to be a long post with lots of pictures!  First, go ahead and layer your quilt and quilt it as desired.  Once it is all quilted, trim the backing and batting even with the edge of the quilt.

The tutorial that I learned from is by the incredible Bonnie Hunter.  You can find it here.  I really encourage you to visit and read her instructions first.  She is doing a larger quilt and when you come back here, I will show you how I adapted it to a smaller quilt. 

Are you back?  Wonderful!  Now for my input and photos.

The number one thing to know before you begin is that you MUST USE bias-cut binding.  You will not be able to do this with straight of grain binding!!  So go ahead and make your binding and set it aside.

The technique that Bonnie used is to cut two shapes--one corner and one "hump."  To cut the corner, you will cut a square of paper that is larger than your border is wide, by around an inch or so.  Fold it in half diagonally.


Make a line at the seam between the outer in inner border, and then cut that small triangle away.
 

This leaves you with a piece of paper that fits your border perfectly, but has a little "window" so you know where exactly to line it up.

Next, grab a bunch of whatever round things you have laying around that might be the right size.  If you are doing a bed-size quilt, glasses, bowls, and plates may be your friend, but for this I grabbed a couple different jar lids and my roll of blue tape.  Lay out your circles on your corner piece until you find one that is "just right."  You don't want the corner to be too small, nor do you want a curve that is too big.

For me, this jar lid was perfect.  I centered it and drew around the outside curve. 


The second thing you must keep in mind is that you don't want to attempt scallops that are too deep!!!  Bonnie says to keep it under one inch from the hump to the valley.  I used one inch on Canasta, but then realized that Bonnie was doing a larger quilt, so the scale was larger.  I had a bit of trouble binding the one inch difference, so for this one, I only allowed a half inch difference.  To help me, I drew a line a half inch from the outer edge of the pattern.

So now you can see my curve and the half-inch line.  Next you hand -draw in a nice transition line from the curve to the  straight line. 

Then fold it back in half and trim your drawn line.  I actually found it was easier to make a graceful curve cutting than drawing.
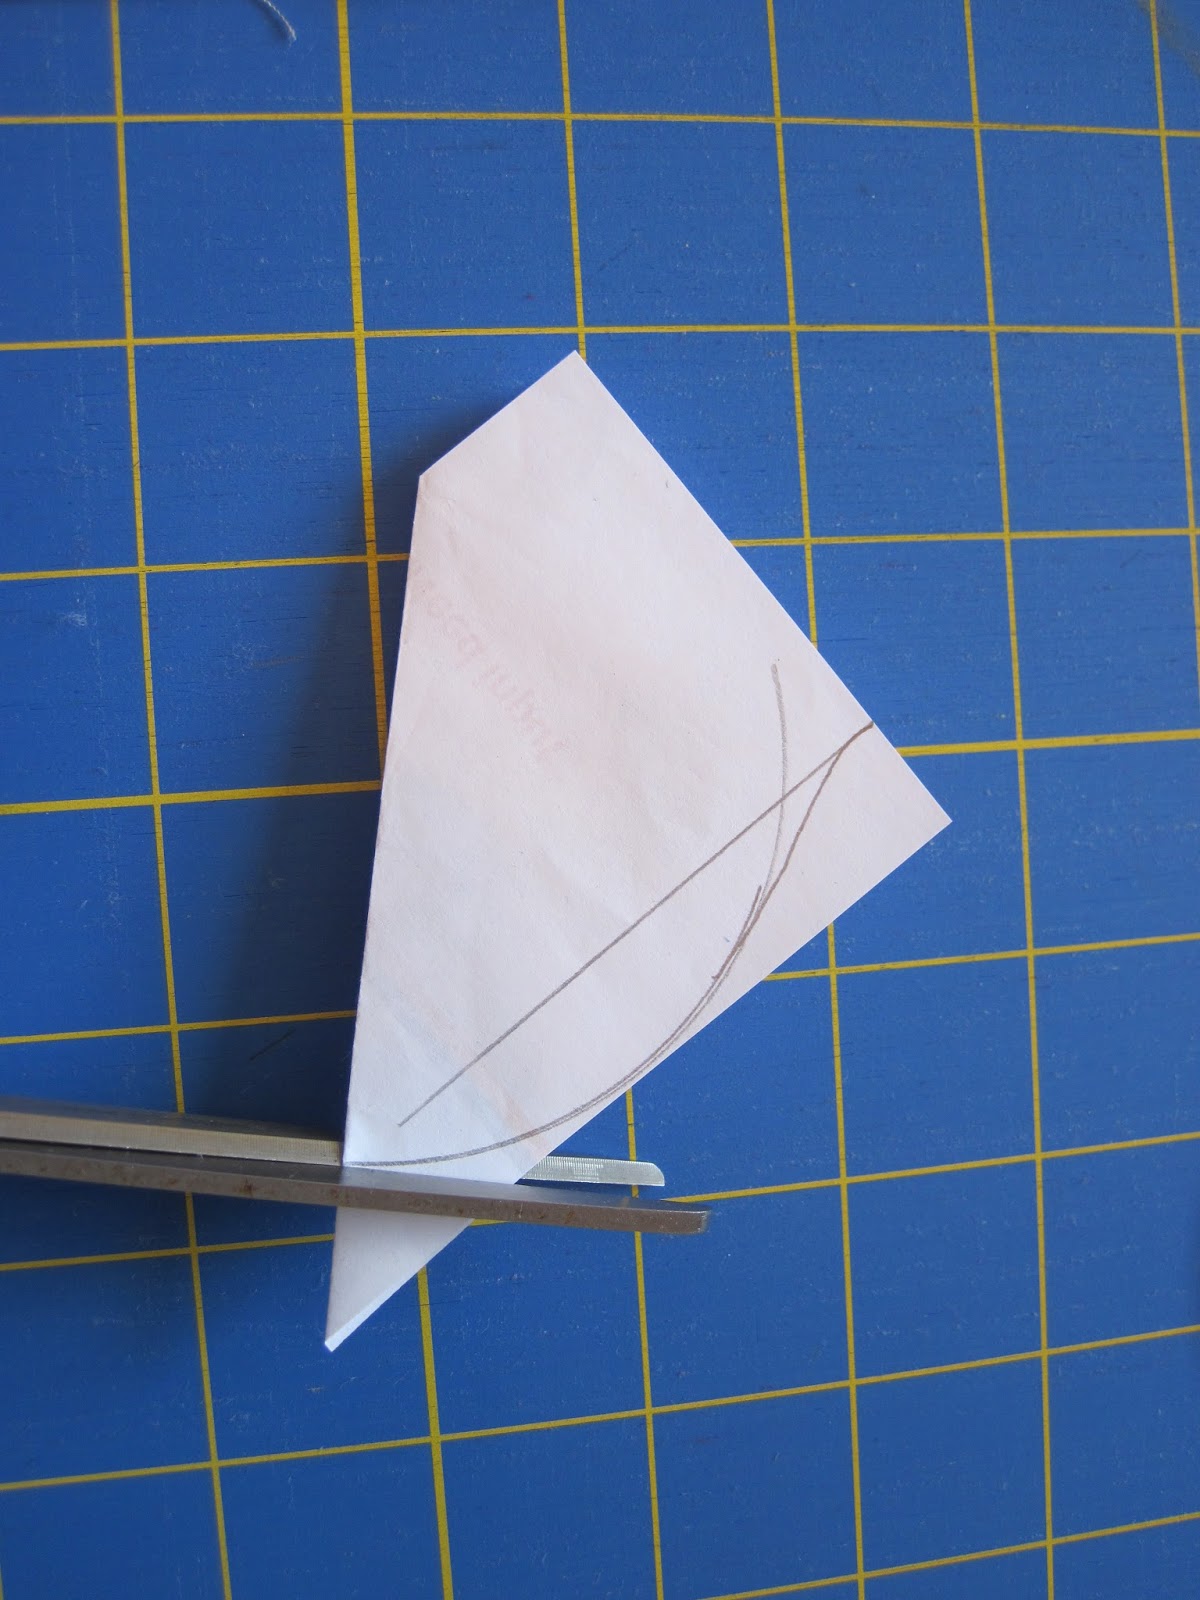

Voila!  The corner template is done!!
 
For the next photos, I cut a second corner template, but you don't have to, just make a mark where one corner ends. 
 
The next step is to measure the distance between the corner templates on each side of your quilt.

 
Here on the top and bottom, you can see that the distance between is about 13"


And the sides measure just short of 17 inches.  Bonnie's technique allows for measurements to not be totally exact. 

Now it is time to do some visualizing and math:

I know that I want more than two "humps" across the top and bottom.  So I did the math for 3 and for 4.

13" divided by 3 is 4.33 inches.  So if I did 3 humps, each one would measure 4.33"
13" divided by 4 is 3.25 inches.  So if I did 4 humps, each one would measure 3.25"

The sides are longer by 4 inches than the top/bottom.  If I'm thinking about 3 or 4 humps for that edge, the sides should have around 4-5 humps, so the math for that looks like this:

17" divided by 4 is 4.25 inches.  So each hump would measure 4.25"
17" divided by 4 is 3.4 inches.  So each hump would measure 3.4"

You are making one template for all the humps, so to have them as close to the same size is very important.  The math is looking good because the humps on both sides are very close:  4.33" and 4.25" in one case, and 3.25" and 3.4" in another.  Brilliant!  If one set of measurements was way more close than another, that is the set I would use.  In this case, I could do either.  To help me make up my mind, I cut templates for both. 

I cut pieces of paper as wide as the outer border and then subcut one 3.25" and another 4.25." 


I used my assorted circle "templates" to draw the curves.


I drew the half inch lines and cut the curves into a pleasing shape.  Can you see on the bottom photo I initially used a circle that was too small?  Trust your eye, it will tell you what looks the best.

I laid out each template with a corner to see which one I liked.  Again, trust your eye.

This is the shorter one

This is the longer one. 
 
To me, I prefer the longer one--the shorter one looks more "bumpy" than graceful.  I decided to use the longer one.
 
Now all you have to do is trace around the templates to mark the scalloped line.  I put the hump piece on template plastic to make it easier to draw around, but the corner was fine as just paper.  I began by doing all four corners.  Then I placed the humps.  On the top and bottom, since it has three humps, I first centered the piece over the center of the border and traced, then I placed the template between the traced line, and the corner. 


 This is how easy it is to use these two templates.  Above, the pieces are squished together, and below they are spread apart. (I photographed these examples on the back of the quilt so they were easier to see.  You want to lay everything out and trace it on the front of your quilt.) This technique allows for the fudging and fiddling that you need to get your pieces to fit!  I'm telling you, Bonnie Hunter came up with a gem here!
 

Pin your binding in place.  You may have to really "boss" it around to get it in place around the curves.  The bias will stretch nicely around the humps, but you will struggle more with the fullness in the valleys.  I found using a stiletto really helped to keep that fullness from pleating as you stitch.

There is a lot going on with this binding, so I find the easiest way to end it is to have the beginning end folded in and then just tuck the last end inside the fold. 

Once it is all stitched, then you trim the quilt to the scallop.
 
 
Next you just hand stitch it down the same as any other binding.  I found that I really like using the clips for this binding.  Best of all?  No corners!!!
 
I hope this helps any of you out there wanting to try one of these borders.  Give it a try and I hope to see some of your results!
 
Have a great day!
JoAnne

Thursday, August 1, 2013

Machine Appliqueing the Dresdens

Hi Everyone,

This is the last of my tutorials showing you how I've been constructing the Dresden Doilies Quilt.


Once the "plates" and the centers are ready to go, I appliequed them on by machine using a blind hem stitch.  Many people use this technique and I'm sure that there are whole books out there on the subject, but this should help you at least visualize things a bit.
 
The first thing to do is to change feet from a 1/4" foot to a wider, zig zag foot.  I like one with an open toe, so you can see.  I didn't have an open toe foot, but my husband fixed that with his dremel--he removed the bar that ran across it, and I haven't regretted it for a minute!
 
Next select your blind hem stitch.  It looks like this one on the right:

What the stitch will do is take around 4 straight stitches, and then jump to the left and take a "bite" by making one zig zag stitch, and the repeat with the straight stitches.

This photo is supposed to be vertical.  I adjust the controls from the "default" or suggested settings for the stitch.  I shorten the stitch considerable, to make the "bites" closer together.  I also narrow the stitch width so the "bite" isn't too wide.  You can continue to adjust as you work.

The next consideration is thread selection.  I use as fine of thread as possible, so it is less noticeable.  I assumed that since I was appliqueing light shapes (in the case of the Dresden plates) onto a red background, that I should use light thread on top.  However, I noticed that the light straight stitches showed along the edge, so I used red instead.  It is so fine, that the one little "bite" stitch really didn't show too much on the light applique.  I used Invisafil thread on the top in red and a light Superior So Fine thread in the bobbin.

Here is a sample: 

The star fabric represents the applique piece and the lighter fabric is the background.  Set things up so that the straight part of the stitch is running right next to the applique piece, and not on.  Slowly start the machine and watch until it takes the few straight stitches and then jumps to the left to take the "bite" stitch.
Can you see that the needle has jumped over to the applique and is taking the "bite" stitch?  In the photo, I can see that it is probably jumping too far to the left--I can adjust the stitch width narrower, so the bite won't be as big.

Here you can see that the needle isn't as far over as it was above.  Just continue on--you don't have to go real fast, keep it nice and slow, watching so that each jump takes its bite of the applique and that the straight stitches are staying right next to the applique.

This is the result.  You can really see it because of the red thread.  Once you practice a bit, it is time to work on the real thing.

Going around a curve or circle is a little different, but I go slow to keep the needle right on the edge of the applique.

When done, you can barely see the stitches.  And it is so much faster than doing it by hand!

I am packed up and ready to head out to my retreat.  There is actually a few things left in my quilt room, but not much, ha ha!

Have a great day!
JoAnne
 

Wednesday, July 31, 2013

Dresden Centers

Hi Everyone!

I have now packed approximately 46 potential projects to take to my 4 day retreat.  Alright, I suppose I'm exaggerating a bit, but it doesn't feel like it.  The thing is that I'm obsessing so much with having everything I need for each project that I'm sure I'll do something dumb like forget my machine's foot pedal.  Or my pillow. 

I also worked on my challenge quilt.  I wanted to get it off my table and out of the way.  The plan was to do an applique quilt, but with fusible.  I got the background prepped, stems basted on and traced all the patterns, ironed the fusible to the fabric, cut out all the shapes, carefully arranged them, removed the paper, and fused them in place.  And something didn't look quite right.  I kept looking at the photo of the quilt and then at mine and it seemed like mine was too big or something.  The pattern shapes were, like most magazine patterns, on an insert.  They were all on one part of the folded insert next to a fold.  I opened out the insert and discovered the instructions on the other side that said to "enlarge the pattern pieces by 200%!"  I've never seen any templates in magazines that needed to be enlarged!  Did I mention that I'd already fused everything in place?!  Ugh!  I was able to peel them all off, but the project is being set aside for now.  I'm not sure if it is going to get finished now, either.  I'm not just frustrated by the fact that I made a mistake.  I'm also a bit unhappy about how easy it was to peel off the fused shapes.  This was a new product for me that is supposed to be "the best" and I followed all instructions, I prewashed the fabric and used no softener, and the pieces still came right off. 


Anyway, I want to share with you today how I did the centers of my Dresden plate blocks.  The pattern instructions in the magazine say to use raw edges and an applique glue--so in effect, you trace a circle, cut it out and glue it on.  I want to machine applique instead, so I needed to come up with a way to get a nice, smooth circle.  Have you ever tried to applique circles?  It isn't easy to get a nice circle.  I love the Perfect Circle templates, but I don't have the larger set, so I had to think of another way.

In my other life, I am a scrapbooker.  Okay, to be fair, I think I now have to say that I WAS a scrapbooker since I haven't touched it in nearly 2 years, that I packed away many of my supplies to make room for more quilting stuff, and most importantly--I haven't bought any new supplies in nearly 2 years.  However, I still have (and use) many of the tools.  One of the tools that I really like is my Cricut paper cutter.  It cuts many shapes in different sizes easily.  I used it to cut three different sizes of circles from cardstock for my centers.  I cut at least one for every circle I needed because I wasn't sure I would be able to reuse them.

Here is one of the perfectly cut cardstock circles, these are the finished size of the centers.
 
I then cut circles from my fabric that were an inch or more larger than the cardstock circles.  I look around for something round that is handy and close to the right size.  When I was fussy cutting the medallion fabric for my large centers, I used a blank CD.  The middle of the CD is clear and there is a hole so I could see that the motif was perfectly centered in my circle.  It worked like a charm!
 
 
I then took my cardstock and fabric circles downstairs by the TV.  Whenever I was watching something, I worked on the centers. 

I did a running stitch all the way around the circle near the edge, but not too close.    Then I place the cardstock piece in the center of the fabric (against the wrong side of the fabric) and pulled up the thread, as tight as I could, and knotted it off.

Like so.
 
Next I took them to the ironing board and pressed them with a hot iron both from the back side and the front side.
 
I sprayed them with starch and pressed again on both sides.  Carefully!  You don't want to burn the paper.  Once they are dry again and cool, I clipped some of the stitches and carefully removed the cardstock.

 You can see that the seam allowance has pulled slightly open, so I carefully pressed it down again.  Can you see how the cardstock is wrinkly because the starch got it wet?  That was why I cut one for each center, I wasn't sure how well they would work a second time, but I misplaced one, so I reused an old one, and it worked fine.

The results--perfectly turned, smooth circles!
 
If I didn't have the Cricut, I would have carefully cut circle templates from no-melt template plastic and used them.


I finished appliqueing the 9 small dresdens to the center so now I'm ready to add the borders.  They require 16 medium plates and 16 more small plates.
 
 
I will also share how I'm doing the machine applique.

Have a great day!
JoAnne

Tuesday, July 30, 2013

Dresden Tutorial

Hi Everyone,

I thought I would share the process of make the dresdens in case not everyone is familiar with the process.  I have heard from some people who tried making them in the past but didn't have good results.  I think I tried my first one way back in the 90s and it was rounded on the ends like this photo.
(It was an unmitigated disaster, too, by the way)

 
The problem with doing a rounded one is that you have to turn the curves under for applique--not fun.
 
That's what makes using the ruler, or the templates, for your blades so great--it self-turns making the applique a breeze.  Just watch.

Once you cut all your "blades" they look like this:  a thimble shape. 
 

First thing, press it in half the long way, right sides together.
 

You really will want the crease you just made later in the process
 

Next sew along the wider, top edge.  I like to start with the fold, but it doesn't matter which end you put through the needle first.

Here is my chain back at the ironing board.  Clip them apart.
 

Next you will clip the folded corner to eliminate bulk.

Like this
 
I do quite a few at a time.

Then turn it right side out and gently poke out the corner with a point turner. 


You will have a pile of these after they are turned right-side out.

Next you are going to press the tops flat.  You want to center your seam along the crease.  If you didn't have a crease to help you find the center, you can end up with some wonky blades.

Then you press it flat.

A finished blade!

Next you sew the required amount together.  These are the small ones for my pattern, so I used 14. You can see that it doesn't want to lay flat. 
 

Turn it over so the seams are facing you and then press them around in a circle, either clockwise or counterclockwise.

As you work with it, it will lay flat!  (Even if you doubt it will!)  The seams may pleat a bit at the center, but remember, it will be covered with the center circle.
 
The important thing to notice is that there are no raw edges on the outside of the plate!  Sewing that top seam has turned the edges for you!
 
When I did the largest plates, I appliqued the ring onto the background first, and then went back and covered it with the center circle.  Now that I have to deal with a larger, heavier background (the blocks with the large dresdens are now sewn together,) I decided it would make things easier to applique the centers onto the plates first, so that I have to handle the heavy top less.
 
I'll be back tomorrow to show you how I do the centers.
 
 
Have a great day!
JoAnne