Pages

Welcome

Life, Liberty, and the Pursuit of Fabric... Welcome to the Patriotic Quilter where I like to share all things quilty as well as red, white, and blue! Please feel free to look around and enjoy yourself! I would love to hear from you.

Showing posts with label quilting room. Show all posts

Monday, March 18, 2013

Quilt Room Project

Hi Everyone,

Did you all have a marvelous National/International Quilting Day?  I spent it at an antique show and a Civil War battlefield.  I didn't take so much as one stitch!  I usually spend my weekends with my husband--so I don't often quilt on those days. 

On Sunday, my husband seemed a bit bored, so I got him to help me with a project for my quilt room.  If you have been following me for a while, you may remember my post about my quilt room after we got moved in and settled.  If you haven't, you can read about it here.

I have loved the room and haven't made too many changes.  I could always use more storage, though (can't we all?) and I found this blog post on pinterest.  If you scroll about halfway through, you will see this picture.fabric-storage-wall (1)
The photo is linked to a blog, but try as I might, I couldn't find out anything about this rack thing.  Isn't it cool?  In my quilt room, I have this area:


See how the wall with the two quilts is "free" but there isn't much clearance for anything to be up against it?  I thought that "rack" would work out great here.  I did some figuring.  The wall is just over 4 feet wide.  I decided that we could make one pretty easily.  We bought 3 1x4s that were 6 feet long.  One of them was for the top, so my husband cut it to 4 feet. (You can also have them do it at the home improvement store.  We got our stuff at the "blue" one, not the "orange" one.) The rack would be six feet high and 4 feet wide.   I decided on having 8 dowels for the "rungs."  Why 8?  It just seemed right.  We got dowels that were 3/4" thick and 4 feet long.  Again, it seemed right--not too thick, and not too thin.  I took one of the side boards and marked it.  First I marked where I wanted the top dowel to be, and then the bottom--you don't want one too close to the floor!  Then I split the difference between so I had eight marks for the holes.  My husband has a spade drill bit that drills 3/4" holes--that is a necessary item!  This next step is important, too.  Clamp both side board together with the marks on top and drill all the holes through both boards at the same time so they are perfectly spaced! We sanded and then he screwed the sides onto the top.  Next we put most of the dowels in (to help stabilize it) and took it to the wall to position it.  We marked where we wanted it to be and set it aside.  To hang it, we took a piece of 2x2 and screwed it into studs along our marked line.  Then we sat the rack on it and screwed up from the bottom of the 2x2 into the top of the rack.  That was it!  It took about an hour and a half and all the stuff cost less than $36!  If we weren't renting, I would have painted it, but I didn't want any paint to rub off onto the wall.

Here it is!

See all the stuff I started putting on it?  I have lots more room, too.


Here is the top.  Can you see the darker board?  That is the 2x2 that it is mounted to.  The top makes a nice shelf for display! 
 
Right now, I have put up unquilted tops, blocks for on-going projects, and other incomplete projects.  I also  have a partially used jelly roll hanging there.
 
 
This is going to be great when I'm doing a project with lots of strips and strip sets.  Also, it will be a great place to hang borders, etc.  I'm just thrilled with the added storage!
 
 
I hope you all have a great day!
JoAnne


Thursday, February 7, 2013

What's Underfoot in my Studio. Literally.

Hi All,

I thought I would share with you a few additions/purchases for my quilt room which I'm really liking.  A while ago I was watching HGTV and saw a commercial for a Gelpro floor mat.  The commercial said it was great for chefs or others who stand in place for a long time.  I immediately thought of my quilt room.

Do you stand when you cut?  I do.  I feel like I don't get any accuracy or the right torque if I'm sitting.  Sometimes if I'm having a major cutting session, I do get tired and my legs and back get sore, so I decided to investigate the gelpro mats and found them here.  I read the reviews and ordered one. 
They have many colors available and of course, I got red.  I should have considered the color of my floor--I don't think the red goes with the color of the wood, but as the floor is in our rented house, I'm not too upset about it.

I have to say that I've been using it for three-four months now and I LOVE IT!  I have spent lots of time standing on it and it really helps with the fatigue.  I can imagine that long-arm quilters who may stand for long periods of time would really like using this, too.  (No one is paying me to say this, by the way!)

Last Saturday, I went with my husband to Harbor Freight.  I don't really like going there, but since my husband will occasionally accompany me places I know he isn't too interested in, I went along.  If you have never been to that store, it is hardware and they have coupons.  As we looked around, my husband pointed out a set of four "anti-fatigue" interlocking floor tiles.  They are made for the garage and so are industrial grey, but the set was only $5.99 with a coupon!  I got them because I've been needing to solve another floor problem in my studio.


I don't know about you, but for some reason, I manage to knock my iron off the ironing board.  Again, I have a wood floor in a RENTED house and I really don't want to damage the floor.  Three of the tiles were the perfect lenght for the nook where my ironing board stands, so that was easy.  I cut the 4th in half and attached it to the end pieces so to make it wider.

(Can you see how they interlock?)

Some floor is exposed under the ironing board (where I didn't have another half-tile), but not in a place where the iron will land.  By the way, have you ever knocked your iron off the board onto  carpeting?  And the carpeting melted to your iron?  I've been there!  Yikes!  Anyway, it has only been a week and I have managed to not bump the iron off, but I have noticed that it is nice and cushy to stand on while ironing, too.  It was a great investment for 6 dollars. 

I love when I can find solutions for problems I may have in the quilting room.  Is there any non-quilting tool/product that you can't live without in your studio?  I'd love to hear about it.

Have a great day!
JoAnne

Wednesday, September 5, 2012

Hanging Quilts


A while back, after I posted my quilting room reveal, I was asked by Carmen how I hang my quilts.  I emailed her a response but thought it would make a good blog topic, as well.


The most important tools I use are these:

A level, hammer, blue tape, and either applique or sequin pins


If you aren't familiar with these kind of pins, they are shorter than regular pins.
 
 
When I began the wall of small quilts, initially I laid out the quilts on the floor and then moved the composition to the wall, but the spacing wasn't just right, so in the end I decided to just tape them up so I could move them around until I got the arrangement just right.
 
The blue tape was enough to hold these small quilts up.  When the arrangement was completed, I used the hammer to "nail" the pins right through the quilt and into the wall. 
 
Don't have a heart attack!!!!  This does no damage to the quilt.  It is just a pin hole, and it disappears easily when the pin is removed.  I have been doing this for 15 years with no deterioration whatsoever.  And believe me, they come down and go back up on a different wall every time I move!
 
 
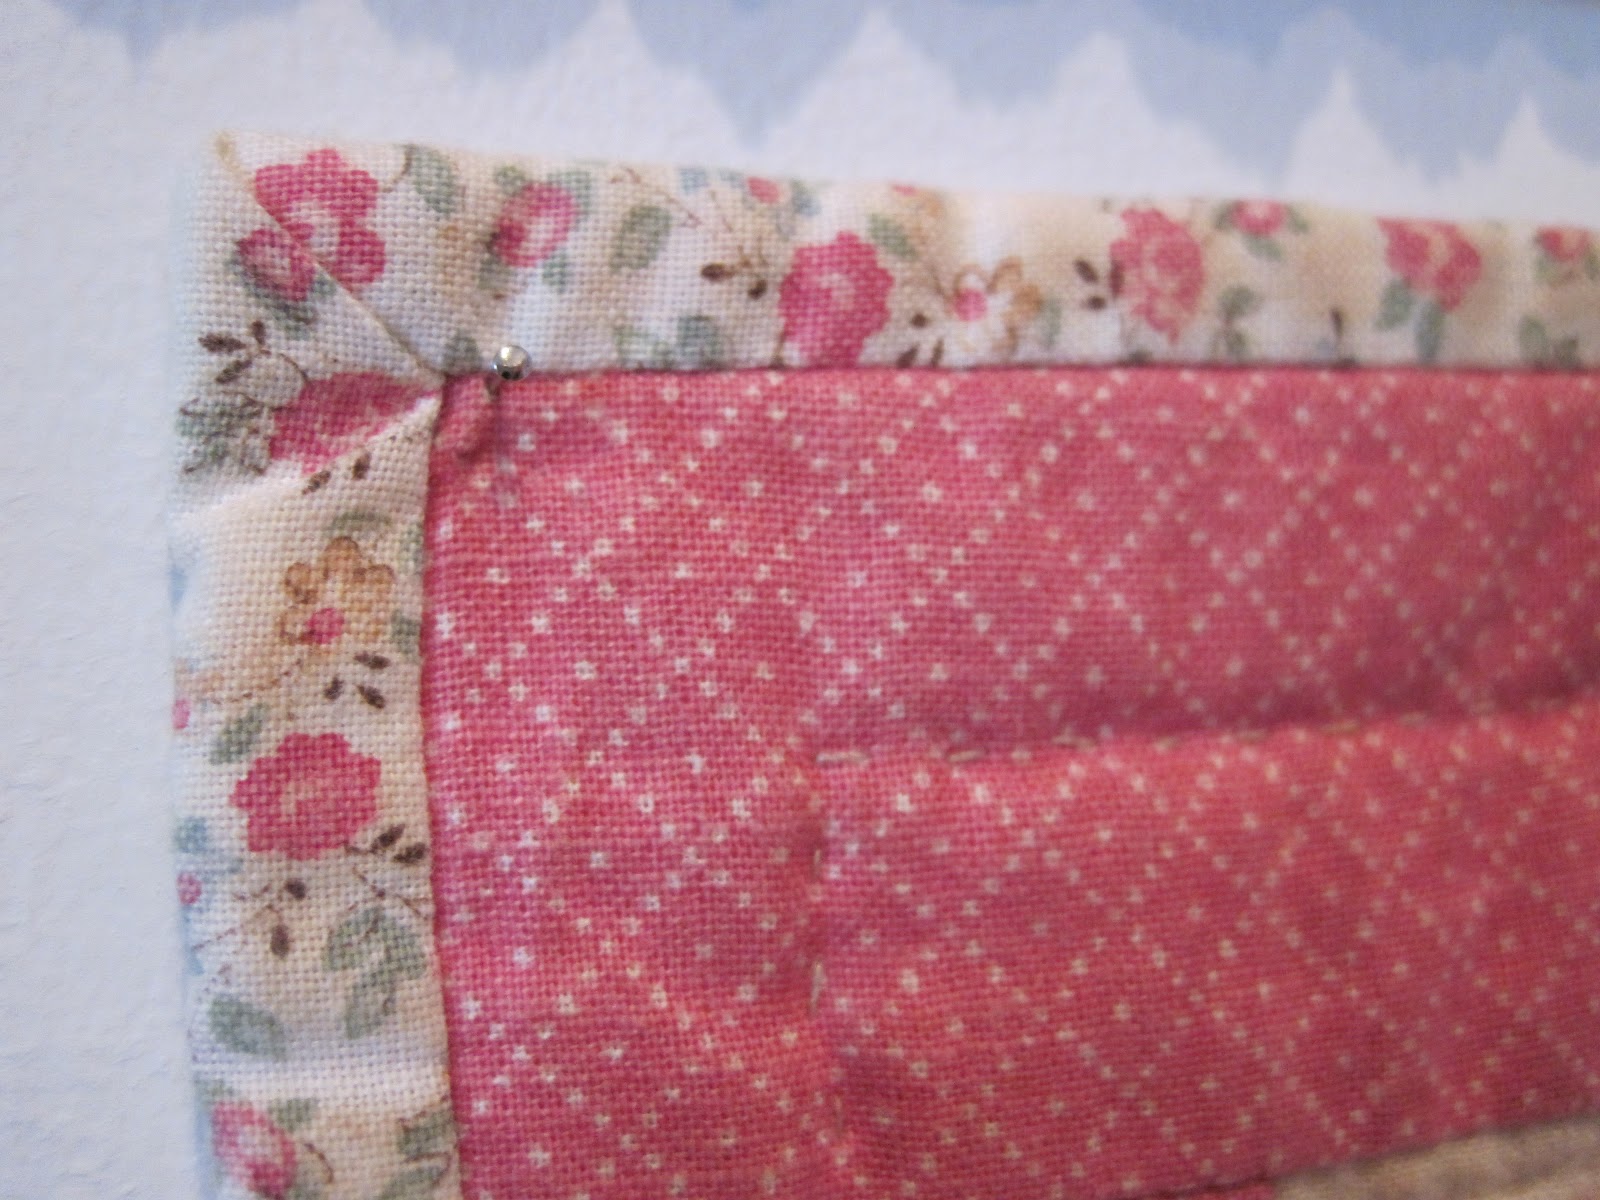
Furthermore, when you do take them down, all that is left on the wall is a tiny pin hole.  You don't even need to fill it with spackle.  (This is very helpful when you move all the time.)  These little quilts only require one pin in each corner and maybe one in the middle of the top edge so that it doesn't sag.
 
 
Can you see the tiny head of the pin there in the corner?
 
 
Larger quilts can be easily hung using this technique, as well.  Here is how I do that:
 
 
First I use the level to run a strip of tape horizontally where I want the top edge of the quilt to be.  I used about 10 pins evenly spaced across the top, aligning the binding to the bottom of the tape.  You can see, though, that it isn't hanging nicely.  I use the level again and run vertical strips of tape on each side so that the quilt can be pinned on the sides to make it square.  
 
What you don't want to do here is grab a bottom corner and yank it over to the edge of the tape.  You don't even want to drop just halfway down and pull the edge over like this:
 
 
See how it curves the binding?  If you do this, you will never get the edge straight, it will just scallop all the way down the side, whereever there is a pin.
 
Instead, start at the top and place your hand in the interior of the quilt and smooth it over to the tape.  When the binding is nice and even with the tape, put in a pin.
 
 
Work your way down the side of the quilt and then do the other side.
 
 
See how the quilt is now smooth and perfectly square!  It works like a charm.  You may want to pin the bottom edge, too, if there are any ripples or if the bottom wavers a bit. 
 
Experience has taught me that if you don't put the pins close enough together, especially on the top edge, the quilt may sag over time.  It is pretty easy to put some more pins in, but usually I take it completely down, wash it, and then put it up again, this time using more pins.
 
The other big, big tip to keep in mind is that you really have to support the pin with your fingers and tap gently with the hammer.  If you don't, the pins will bend.  Even with all the practice I have had, I still manage to bend some, but once you get the "feel" of it, you won't bend so many.
 
 
I emailed this technique to Carmen, but she replied that it wouldn't work because her walls are plaster!  I've been mulling it over ever since, but the only thing I can come up with is if there may be a Command removeable adhesive thing that might work.  Do any of you have any potential solutions?
 
Have a wonderful day!


Tuesday, August 28, 2012

My Sewing Desk

I am happy to report that I got batting, layered my Schnibble (this month's pattern is Dimestore), got it quilted, bound, and washed yesterday!  I'm really pleased with it and can't wait to show it later this week.   I also was able to make 4 more star blocks (only 115 more to go!)

Getting back to the quilting room, I wanted to share a bit about my sewing table.

 
As I mentioned briefly in the post about the island, it features another countertop from the Habitat Restore.  This one is the standard width.  I have used  countertops before--in Hawaii I bought a new one at the home improvement store.  I ran that counter the whole width of the room, just over 10 feet.  That counter came with the "back splash."  I didn't want that--just a flat counter, so we cut it off.  This time, we found the flat counter--perfect!  All we did was to trim it to fit the alcove (73 inches) and then used a hole saw to cut a hole in the back  for cords.


The counter is just sitting on these Closet Maid closet organizers.  You may be able to see a crack/seam under the thread catcher.  The closet organizers are a bit narrow, so I put one in front of another.  This gives me really deep storage cubbies on each side but more importantly, supports the full width of the counter.


This side is just like the other one.  To be clear, I have 4 closet organizers in all, one in front of the other on each end.  You can also use file cabinets, or nightstands to hold up the counter.  I chose the closet organizers because they are a bit higher (remember I'm tall.)  There are also pretty inexpensive.  The other feature that I like is that they are not too wide.  Before Hawaii, I was using two unfinished base cabinets with a six foot long counter on top.  The cabinets were so wide that there wasn't very much open space underneath for my legs.  So far, I'm really enjoying the closet organizers.  If I owned this house, and wasn't planning to move, I would have my husband run a 2x4 or 2x6 along the wall behind the counter for additional suppport.  With the much longer counter that I had in Hawaii, I had to use a small bookcase to support the middle. 

So there you have it, a sewing table just over 6 feet long for under $20 (because I already had the side supports.) 

I'm off to grocery shop and do some housework.  I'm trying to make at least a few star blocks everyday, though, so hopefully I'll be able to play later!

JoAnne

Wednesday, August 22, 2012

The Island

Wow!  Thanks for all the positive comments yesterday!  It was a fun day.   The most interest had to be in the island, so I thought that would be the first thing I talk more about in depth.

I can cut on most any comfortable surface.  In my last room, I cut on the other end of the sewing table.  In the past I shared my space with the laundry room, and I used the top of the dryer.  The dining room table is popular, too.  But when I saw the space in this room, I realized I wanted something in the middle of the room.

My last house--in Hawaii--had a fabulous kitchen island.  When I had to deal with large pieces, I would take my mat and rulers downstairs and use it.  I loved the height (36")--I'm 5'9" so fairly tall.  Cutting on a table hurts my back.  I also realized fairly quickly that I could make that first cut with the rotary cutter and then instead of turning everything around to proceed in cutting strips, I could just easily walk to the other side of the fabric, ensuring everything stayed perfectly straight.  It was also really handy for pin basting quilt sandwiches, too.  So what I wanted in my new sewing room was an island.

My first instinct was to search Craig's List for used islands.  The results weren't good.  The next step was Google.  I had been searching for quilt room/sewing studio/etc. ideas for weeks.  One idea that I stumbled on was to use two dressers back-to-back with something for a surface on top.  I think the first one I read about used a door.  I liked this idea becasue I really wanted drawers for storage.  I did browse the kitchen cabinet section of the home improvement store, but the prices were higher than I wanted.  (Remember--the theme of this room is Cheap!)

So it was back to Craig's list, thrift shops, etc. to try to find some reasonably-priced dressers.  If you have never looked for two--sort of matching--used dressers that have functioning drawers, and don't smell, for a reasonable price, well--it isn't easy.  I did find inexpensive new dressers at Kmart, but they are pressed wood and they were around $70 each, so they were more than I wanted to spend.  Meanwhile, I was also investigating what I would use for a top.  I was settling for a sheet or two of MDF because I knew that a door may not be wide enough for the two dressers.  And then we went to my new favorite place ever!  The Habitat for Humanity Restore!!!  This is a place where they have new and used cabinets, furniture, building supplies, etc.  We looked at cabinets and furniture, and then we went around a corner and found used counter tops!  I planned to use a counter top for my sewing surface (I'll blog about that later) and was delighted to find a length of standard-width counter without the "backsplash" at the back.  This one was just a flat surface--exactly what I wanted.  It was $20 for an 8 foot counter.  Next to it was a matching, wider length (36")--like for an island!  This was perfect--just what I wanted.  It wasn't marked, but we took it up front anyways.  We were told that it was a dollar a foot--and it was 8 feet long, too.  It was $8!  Both counters were used and had some chips, etc. but the price was right.  Most of the damage was at the ends and I knew we could easily trim it down.

Now that I had a top, I really was trying to make a decision on the dresser situation.  I decided to go back to Kmart to look at those dressers one more time.  They were on sale!  They were down to $39 each, so it was an easy choice to get them.  My husband and Dad put them together one evening while my parents were visiting.  I knew that the dressers were only 31 inches or so tall, and that I wanted my island to be 36 inches tall, so the plan was to build a plywood platform to use as a base for the dressers which would bring them up to 36."  When I put the dressers back-to-back I thought they would be fine at the original height.  We couldn't work any more on the island until the next weekend, so I worked on a quilt during the week, and used the tops of the dressers for my mat to cut.  Boy am I glad I tried it out.  The 31" height was not tall enough!  So last weekend, we made the base with a sheet of plywood and 1x4s.  Once it was constructed, I painted it and the legs with white spray paint.

When dry, we took the base up to the room, applied felt pads to the bottom, then set it down and put the dressers on top. 
You can see the platform under the dresser.  You may be wondering why those side board are "hanging" out there.  I didn't want the base to stick out that wide--I would keep kicking it. 


One other step we did for the dressers was to measure the distance from the top of the drawers to the top of the dresser.  I found that it was about half an inch.  The counter has the over hang and the over hang was 5/8s of an inch.  If we put the countertop right on the dresser, the top drawers wouldn't be able to open, so we cut a piece of quarter inch plywood the same size as the dresser tops.  I didn't paint it, as it would be hidden under the counter.  I was so glad I thought about this step!  I would have been ticked if we got everything together and the drawers wouldn't work!

Next we measured everything from the floor up--the total height was targeted to be 36" and it was!  The legs we found at the home improvement store were 36" so we didn't have to cut them down.  We trimmed the dmaged ends off the counter, carried it up to the room, attached the legs to one end, put the other end on the dressers, and then screwed from inside the dressers through the top and the 1/4 inch plywood and into the bottom of the counter.  Presto!  I now have a surface for cutting that is 36" wide and 7.5 feet long!  The total amount spent (dressers, counter, legs, plywood, etc.) was less than $200!  I was thrilled.

Then I noticed a problem.  We had just sat the dressers on the base, but the weight of the counter top was forcing the dressers apart at the bottom.  So we got some mending plates and used them to hold the two dressers together.
I didn't want to look at that seam with the patches on it, so I went to the craft store and got some cork tiles.  (They were 40% off!) I stuck them on the dressers to hide the seam.  And I get a bonus bulletin board!
You can see the side is now all "corked" in this picture.

The cut ends of the countertop were ugly pressed board--no laminate covering them.  I know you can buy bits of laminate and trim them, but that seemed like more money than I wanted to spend, so initially I just painted the ends white, too.  But as I was measuring with one of my yardsticks, I realized that a yardstick would make a neat trim piece!  I bought two for 69 cents each and have them tacked up.  I still need to round the corners, though.  I filled most of the open space underneath with the rolling plastic drawers that I had, and my trash can even fits underneath. 

I am now going to look for a stool or two at thrift stores becasue it is so large that several people could sit there working on different projects.

  I know this post was pretty long, but the hardest part of constructing this was finding the pieces and trying to decide what would be best to use--and then working through the steps of assembly--in other words, the thought process, so I ended up sharing that with you.

Here is the "back view" once more.  If this is a project you would like to undertake and have more questions, just ask.  I'll be glad to share!

Have a Great Day!
JoAnne


Monday, August 20, 2012

It's Here--My New Quilting Room Reveal!

Finally, I have the majority of my new quilting room done.  I'm afraid I've seriously been neglecting setting up the rest of the house, but a quilter's got to do what a quilter's got to do.  This is going to be a long post as is so I will discuss more of the features in other blog entries. 


When you enter the room, you come down these few stairs.  My quilting room is over the garage.  Despite the fact that you actually go down into the room, I feel like it is a "loft" and I'm up in my own special world!


As you travel down the steps, the first thing on the right is the design wall.  I blogged about how I made that two days ago.


Just past the design wall, there is a corner that reveals the steps up to the attic.  No, I haven't taken that space over for additional storage yet!  Ha ha. And the N?  You maybe be asking, "hey, your name starts with a J.  What does the N stand for?"  My reply?  "Nothing."  (heh heh heh) 


Tucked in the alcove between the attic steps and the next wall is my sewing space.  It is just over 6 feet long. 


Have you seen this post by Kathie about her wall of little quilts?  I saw it and it inspired me to hang up many of mine above my sewing area.  I love how cozy it looks.  It is going to be wonderful in the winter.  Having all that color is inspiring, too.  The large patriotic one was made by quilting friends of mine from when I lived in Georgia.  And the house one hanging by the N?  It is from quilting friends back at Fort Huachuca, Arizona.  Not only do I feel cozy from all the quilts around me, but I also feel surrounded by friends.


Next is one of the windows.  It is a "regular" window.  In front, on my Great-Grandma's treadle machine, I keep my laptop.


Next to the window are two tall shelves.  These were in the garage when we moved in.  I moved them up here for more free storage/display.


On the left side are some of my precuts.  I finally get to display them!


We turn the other corner and against the sloped wall my scrapbooking supply cabinet fits nicely.  Baskets hold unquilted tops and my collection of yardsticks. 


Next is another alcove which is the perfect place to nestle in my new ironing board.  It is below the big front windows which let in so much light and really contribute to the bright, aerial feel of the room.  The chevron pattern is a throw rug.  I found it, and only it--no other colors, sizes, or duplicates at TJ Max the other day.  Since red is my favorite color, it came home with me.  I'm hanging it behind the ironing board because in the past, I've noticed that the wall behind my ironing station accumulates overspray of starch.  This way I can take it down the rug and wash it instead of scrubbing the wall!  If you look closely, you can see that today was a rainy day.


Around the corner from the ironing station is the closet.  To the right of it, you can see part of the cabinet where I keep office supplies and my ipod.  My favorite feature of the closet?  It is lit!  There is lots of storage here.


The closet is really wider than it looks.  This far corner is where UFOs go to linger.  Can I just say that there is nothing worse than unpacking UFOs? 


But by far, the piece de resistance is this!  The huge island in the middle of the room for cutting.


It is 7 1/2 feet long and 3 feet wide!  I'm tall, so I made it 36" high.  I'll be blogging more about making this later.  I'm in love with it!


Here it is from the backside. 

Well, that is the quick tour for now.  As I may have mentioned once or twice, I will be writing more about some of the features later.  Please come back and read about them! 

Have a Great Day,
JoAnne

Saturday, August 18, 2012

Design Wall

While working on my quilting room, the overall theme is cheap!  I'm not going to sugar-coat it and say that I'm doing it "on a budget" or "as inexpensively as possible."  Nope.  I don't want to spend much money at all.  Don't you love it when you watch a design show that is supposed to be "budget friendly" and their budget is $1000...  or more?  Yeah, not my idea of budget-- hence "cheap."

Remember that we are renting and I'm only going to be living in this house for two years (plus or minus six months, probably) and I don't know what sort of studio I will have in the future.  This one is huge, but I'm sure I won't have that much space in the next one.  I also (for once) don't have to share with a guest room or office, so the space seems so much larger!

One of my requirements is to have a design wall.  You can have a design wall easily without spending too much money at all.  You can go to a home improvement store and purchase diffent sorts of 4x8 sheets of foam insulation, wall board, etc., then cover them and install.  I discovered years ago that I didn't have to buy anything.  After all, I just moved in, right?

If you have ever moved the one thing you have plenty of are empty boxes.  I take some of them, trim off the flaps on the top and bottom and then cut one edge open so I have a long piece of cardboard.

In the past when I've used boxes for a design wall, I pieced the strips into one larger piece, re-enforcing the creases by taping the flaps that I had cut off over them.  But also in the past, I was making a smaller design wall--usually behind/above my sewing desk.  In this house, I have the wall space for a large design wall and so I was dragging my feet with this project, not enamoured with the idea of dealing with piecing all that cardboard and trying to deal with a cumbersome mass.

Then this week I was wandering around in blog world and saw a photo of a design wall.  It was done in panels.  I wish I remembered where I saw it because I would gladly share a link, but at any rate, panels seemed to be the solution.  Finally I could proceed.  I would wrap batting around the cardboard.  I went to my local fabric store--the one named after me, ha ha!  Although I had a coupon on my smart phone (do you not just LOVE that ability?) I discovered that all packaged bats were 50% off!  How lucky was that?  I first grabbed a queen-sized Warm and Natural, but then I saw a different, cheaper brand that would save me $10 (yes, it was regularly $20 less than the W&N) so I decided to get it, instead.  When I paid, the total was under $12. 

I began working with the panels on the floor.  Ugh!  After the first was done, I set up a line of folding tables so I didn't have to crawl around the floor.  Experience has taught me two things:  1.  Do use some tape to stretch the batting out first.  Even if you think you are keeping things smooth, it is easy for some sagging or wrinkling to occur.  It isn't dissimilar to layering a quilt in this respect.  2.  I "dry fit" the cardboard onto the batting and when I saw that it fit fine, I took the cardboard strip outside and sprayed it with adhesive.  In my case, I had spray baste for fabric on hand, so I used that.  That bit of tackiness really helps keep the normally slippery cardboard in place while you finish.


So again, in this photo, you can see that I taped out the batting and sprayed the "nice side" of the cardboard and placed it tacky side down on the batting.


Next, I trimmed down any excess batting and then wrapped it around the edge of the cardboard and taped it with masking tape.  In the past I've used duck tape, but I wanted it to be lighter (and cheaper, yes!) so I used the masking tape and it worked great.  I folded the corners in neatly and as flatly as possible.  I continued in this process making 4 strips of batting-covered cardboard.

In my head, I visualized the panels running vertically down the wall, however I was home alone installing this and wanted to complete it before my husband got home because I began my Schnibble and needed a design wall NOW and didn't want to wait.  My concern was keeping everything nice and straight and level.  I got the idea that I could put the strips horizontally, starting at the bottom where it is easier to reach.  One trick that I use constantly when hanging pictures or quilts on the wall is to use a long level to see that my line is straight and then run a piece of blue tape along it, marking a level guide line that is easy to remove later.  So the next step entailed marking a long line for the bottom of the design wall area and another for the left vertical edge.  Then it was pretty easy to place the first strip along both edges and I used saome small nails to tack it up.  The strip is really pretty light and doesn't require any heavy hardware to install at all.  I wish I had taken pictures at this point, but I was too busy getting it all up. 

The next strip was easier, because I just had to line up the left edge with the vertical tape strip and then run it along the top of the previous strip.  I did the third strip the same way.  And then I realized that I wouldn't need the fourth.  The top of the design wall was already over head high for me, and I didn't want anything so high that I couldn't reach it!

Here is the result.  In real life, it is all nice and straight--the angle of the photo makes it look skewed.  In retrospect, I sort of wish I had sprung for the W&N as the batting I used is a little translucent, however, I figure that it will usually be full of quilt blocks and pieces, so that shouldn't be a problem.

I hope you realize that as long as you have an empty wall, you shouldn't let expense keep you from having one!  This whole thing cost me less than $15! (batting plus masking tape.)

Tuesday, July 17, 2012

A House!

We are no longer homeless!  At least by Thursday.  We put a deposit on a house last night and we sign the lease and get the keys on Thursday.  Oh happy day!  Actually, we are staying in the hotel until our stuff gets delivered and right now we still don't know when that will be, but I'm so happy!

I didn't share with you that one of the houses we looked at was tucked back in a neighborhood.  To get to it, you make a turn off one of the main roads, and on that corner was a Bernina Quilt Shop!  That isn't the house that we chose, however.  Of the 4 we looked at, 2 had just a bedroom for my quilt studio.  The one by Bernina had a bonus room (it used to be the garage, but was closed off years ago, and looked nothing like a garage) but where the garage door had been, it had a long bank of windows.  It would have been a nice studio space.  Above that space was a loft.  It had no windows and a slopey roof line, but it could have been the "fabric storage room" with my "work/play"space below.  I really liked that house--it was right adjacent to a large pond, too, and so pretty.  It was an older ranch-style house, though, and while I could have been quite happy, my husband wanted more of an open-floorplan.

Our house-to-be is newer and open.  I can't believe I forgot to take a picture of the outside!  I will do so soon.  I do have photos of the studio space, though.  It is the bonus room over the garage.  It has a double window sort of high up, which will provide lots of light, but not low enough that the sun could shine in my eyes.  It is down a few steps from the rest of the second floor, and there is a short staircase up into the attic (lots of storage space in there for our Christmas decs, etc.!)  The studio space also has a nice-sized closet.
This is the view when I came down the stairs from the second floor and look right.  You can see the steps and door to the attic.  I really like that nice space to the left of the stairs.  It is a perfect nook for something--maybe my scrapbooking cabinet.


Another view of that great nook and the start of the wall opposite the other stairs.


This is the whole wall opposite the stairs.  It has a window, too!  I love the wood floor!  No carpet to hook spilled pins!


This is the wall at the front of the house, opposite the attic steps.  The bottom of the window is probably nearly 4.5 feet off the floor--maybe more.  I think it is just above my shoulder.  I think I will have my machine set up along this wall.  I would love to find a table that just fits inside that space under the window.  Have I ever shared that I'm a person who really wants somthing to fit a space exactly?  When we got a new entertainment center, we also got a new tv and I didn't care one bit about the "quality of the picture," the brand, or any other features.  I shopped with my measuring tape to find the one that fit the space as completely as possible.  But I digress....

This is the final wall--the one that shares with the steps down from the second floor (you can sort of see them just to the left.  You can see the nice closet!

The closet only has a bar and self above it.  Perfect!  I think my shelves for my stash will fit in underneath, and I can keep the fabric closed up away from dust and sun.


I'm thinking that I would love some sort of island for my cutting, and then I need to decide on a pressing station.  Needless to say, I'm spending my extra time looking all over the internet for great studio space ideas.  Have you seen the idea for an island where you take two shorter dressers and put them back-to-back and then top them with a work surface?  I'm considering that.  I'm also searching through Craigs List.  I don't want to spend a lot of money and you just never know what you might find out there!

I would LOVE to hear from you with any suggestions or other tips/tricks that you employ in your own quilting space or have come across in blogland!

Thanks,
JoAnne