Life, Liberty, and the Pursuit of Fabric... Welcome to the Patriotic Quilter where I like to share all things quilty as well as red, white, and blue! Please feel free to look around and enjoy yourself! I would love to hear from you.
A week ago on Monday was a non-school day for my neice. It was an actual SCHEDULED day off as opposed to a snow day. Snow days for her are no fun as the school has elearning. If there is a snow day, the students log onto the computer after 9 am and have school work to do--that way it counts as a day of instruction. Therefore, she comes to my house and has to do school work.
Having a day off was a treat! Finally we could do fun things like go out to lunch and shop, bake cookies, whatever. We had to take my husband to the airport in the late morning since he was gone for a few days last week. That was okay, though, because we wanted to go to a restaurant for lunch which is located down by the airport.
First, though, she asked if she could finally learn to use the sewing machine. With one thing or another, we haven't had a chance to play too much in my sewing room before now, so we went up there. I decided to have her learn to use the machine and sew a quarter inch seam, so I got out my bin of 1.5" strips, choose two, and had her begin. She was a bit afraid of speed with the machine, even though I had it on half speed, but she found her comfort zone--which was pretty slow, but that is fine.
I thought I would have her sew on another strip so we could examine how accurate her quarter inch seam is (if you sew a strip set of 3 1 1/2" strips, the middle one should measure exactly one inch) but I decided that since she is 9, we could just have fun for now. I subcut her stip set into 1.5" strips, and we flipped half of them to make 4 patch blocks. I showed her how to "nestle" the seams, so that the 4 patches meet perfectly in the center. She wasn't much of a fan--she doesn't realize how valuable the "nestle" is yet! She stiched up her little blocks, but she did have some trouble and so learned how to rip. (I did the rotary cutting, but had her sew, rip, and press.) She actuallly liked ripping, so that was a plus. When she was finished, she had 6 4-patch blocks that measured 2.5 inches. I got out my 2.5" strips and let her choose one. I cut it into 2.5" squares, and we laid out a pattern of alternating 4-patches and squares. I showed her how to sew them together into rows and then sew the rows together into a piece.
We had to leave then to go to the airport and lunch. After lunch, we shopped at Target for a bit and then we got back to my house. She wanted to continue with her quilt. She was happy with it the way it way, but I suggested a border. She choose another strip from my bin and I cut the sections and she sewed them on.
Here she is with the finished top.
Once the borders were on, I showed her how to layer it with batting and backing and pin it. I then did some quick meander quilting. We went to my bin of leftover binding and she choose one. I sewed the binding on, but she helped pin it with Wonder clips.
I sewed the binding down with the machine and her quilt was finished!
I knew she was happy with it, but I didn't realize just how much. She took it to school on Tuesday and showed her class. Then she showed the Art teacher, and the Art teacher is going to put it in the display case at school for a while.
Her are some close-ups. I choose the fabric for the 4-patches just thinking it would be practise. She choose the rest. She loves blue!
I figure there will be plenty of chances for more detailed lessons later, until then she made a quilt! I think she may be hooked!
I'm set to leave for the airport myself today I'll be spending the week back in Virginia at the Mid-Atlantic Quilt Fest. I'm excited to see my friends again!
I realized that a blog post about my new sewing room would be gigantic, as there is lots of thoughts and photos that I want to share, so I'm going to break it down into three separate posts:
Finally I get to show you around the room! There has been a lot of explanation, but I wanted to share my thought process as well as the finished room.
Are you ready to go in?
When you open the door, this is the view of the room.
This is the same angle of the room when we first looked at the house. Aren't before and after pics great? And also, I love how the yellow walls look!
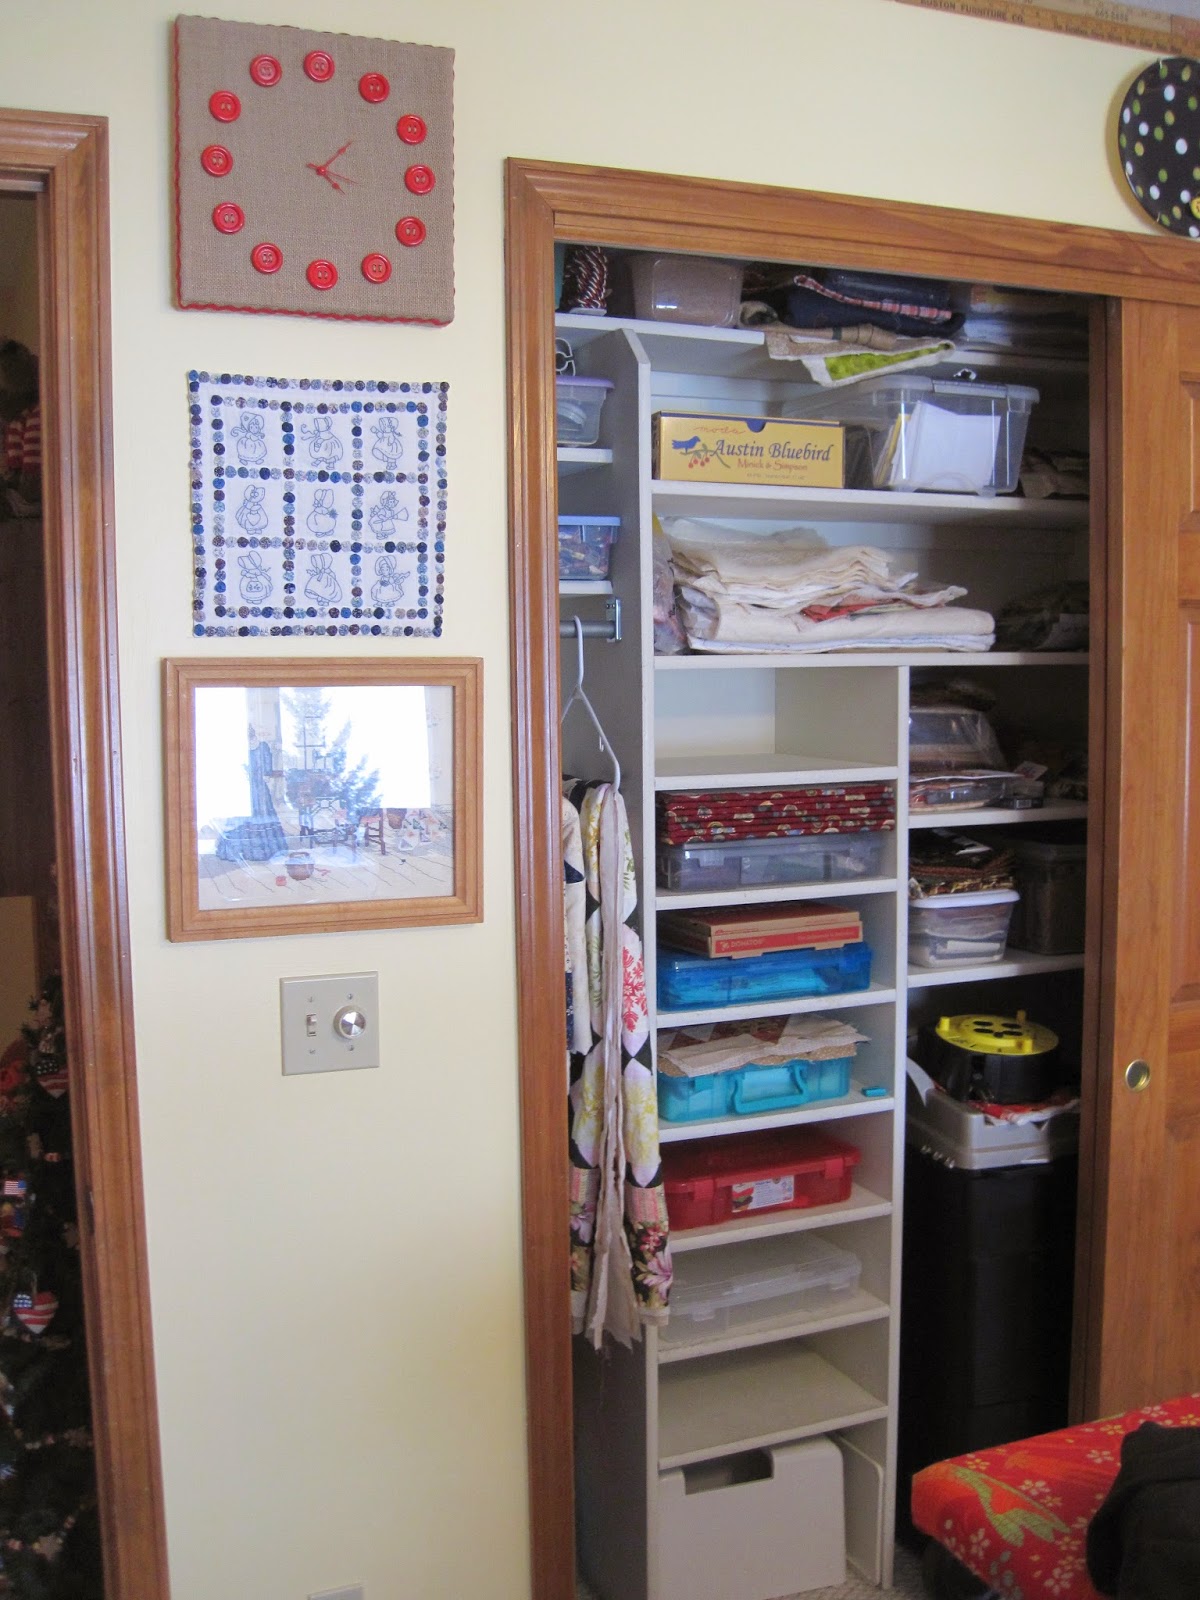
We will travel around the room clockwise. To the left of the door is a bit of wall space and then the closet.
You can see the fabulous closet organizers that came with the house. See how the project boxes fit perfectly on the shoe shelves? I've already made a rule that I can only have the same amount of boxes as there are spots, so once they are full, no more UFOs until something is finished!!
The left side of the closet...
And the right side.
This is the sewing table with spots for two machines. I have lamps for both machines, too. Like I said before, if something is difficult to do, I won't do it. All I have to do is decide which machine I want to use, sit down, and turn on the power and go. I even have a second chair, but it's downstairs right now until I get one for my computer desk. I am LOVING the Alex drawer cabinets from Ikea. The top drawer on each side has all the feet and attachments for each machine.
The one on the left is full of thread! The bottom drawers are deeper and hold cones of thread perfectly. The drawers in the other cabinet have notions, my machine quilting necessities, etc.
The center Alex door cabinet has two shelves for deep item storage--like my roll of freezer paper and other large items.
Above the machines is my wall of minis and other favorite items.
Aren't the red scissors great? My friend Linda got up early and went to the local quilt shop in Virginia one morning because the shop was having a rummage sale of display items. She thought I needed them and I just adore them--mostly because I think of her whenever I look at them. I still have my "N" (what does it stand for? Nothing, heh heh heh.) On the right side you can see the edge of the first of the Billy bookcases.
Remember, this is the "L" shaped unit that I needed to use the narrow bookcase instead of the wide one. You can also see how we butted the bookcases against each other in the corner. All three of these pieces are attached together in the back. We used 3 angle brackets to do the corner, and then 3 metal "straps" to add the narrow bookcase on to the corner bookcases. We did the same in the other corner--you can't skip out on safety features! I have all of my fabric over here on this side because the sun comes in the window at an angle and mostly shines on the other side of the room.
This is a different view of the same corner. I left one shelf out of the narrow bookcase so I have room for bolts of fabric. The bottom large shelf is filled with rolls and large pieces for backings.
My Great-Grandmother's treadle fits perfectly in front of the window. As of right now I don't have a window treatment. At some point, I may make a valance, but I don't plan to cover the window too much.
Now for the other set of Billy shelves. This side is more for display, although I've made sure to have plently of room for increasing fabric. I forgot to mention in the earlier posts that is is extremely important to me to have "growing room."
See the red crate that I have thread in for display? Linda also got me that at the same sale as the red scissors.
I shopped in several places for red baskets and containers for hidden, but pretty storage. (I had luck at the Container Store and Hobby Lobby.) I love how the shelves almost reach the ceiling. I considered the shorter shelves, but I knew if I did, I would just pile stuff on the top, so I did the taller shelves--they look neater this way.
Next are the Trofast units for fat quarter storage. You can see one of the bins is missing--I had it on the cutting table. It is so easy to grab the bin of the color that I need. I have been using these for nearly two years now and still LOVE them. For my third unit, I got one of the double containers (it takes two slots instead of one--you can see it on the bottom right) and it has some precuts inside.
I found the apothecary cabinet that is on top of them at Hobby Lobby and couldn't resist. I may repaint some of the drawers, but for now they are fine.
On top I got some cracker jars and painted the lids and added pretty drawer knobs for handles. This is also an idea by Lori Holt.
The apothecary drawers are already filled with things like rick rack, bias tape, lace, etc. I've labeled them all, too.
Another feature that I wanted was a bulletin/inspiration board for notes and ideas, etc. My husband and I made this from a sheet of homosote (only $5 in the "slightly damaged area of the local home improvement store) covered with batting and fabric and stapled. I added the ribbon and used upholstery tacks where it crosses.
The inspiration board leads back to the doorway. Down the middle of the room is the cutting/ironing island. It measures three feet wide by 89 inches long. With the fabric cover, I can remove the cutting mat and use the entire surface for ironing! It's amazing.
I've mentioned before on this blog that I collect yardsticks. It may seem weird to some, but I love them since they are used for measuring--they remind me of fabric. I love old wood, and history, and I've tried to find sticks from places we have lived or felt a connection. I have a Pinterest board of yardstick ideas and I always knew I wanted to use them somehow in my "forever" room. I ended up using a double layer as trim around the top of the room. I love the effect that they have: I feel surrounded by "yards of history and memories." In the picture below, Hawarden is my husband's home town.
Here is the closet with the design wall in place. The small quilt is the free Valentine's Day project from the Temecula Quilt Co.
I said that the number one requirement in this room was lighting. So far I haven't changed it at all. With the new wall color, all the reflected light off the white shelves, and the window, it always seems bright in here--even at night. Although this room is smaller than the one in Virginia, I think it has way more storage and I like it even better.
I have plenty of storage--and while the shelves seem full now, there is lots of room for more fabric, etc. Some of the shelves are full of project "piles" containing everything need--I just have to grab a pile and begin to make it. Also, one or 2 shelves has all of the pre-cut pieces for an on-going major project.
With my major requirements fulfilled, and the room filled with everything I love (and nothing I don't,) this room is my dream. I LOVE to be in it! There isn't a comfy chair or a tv--those are elsewhere in the house, but I do have my ipod and a cd player for my favorite sewing listening: audiobooks when I cut and piece and music when I machine quilt.
My last tip is that I plug the iron into an extension cord that is right next to the door. It is easy to see if I remembered to unplugg it as I leave the room.
As nice as the room looks, it functions beautifully! I don't do "pretty" just to be pretty. I need everything to work easily--and it does. I think that is my favorite thing about the room.
Well, that and the view out the window. It changes every day.
I realized that a blog post about my new sewing room would be gigantic, as there is lots of thoughts and photos that I want to share, so I'm going to break it down into three separate posts:
At the conclusion of my "Choosing" post, I had decided to take over the purple and pink nursery for my sewing room.
Now it was time to plan. I began with a fairly clean slate. The one item I knew I wanted to keep in my sewing room, if possible, was my big cutting island. My previous sewing table/desk had consisted of a counter top sitting on some closet organizing shelves. It was six feet long, which gave me plenty of space for one machine. I had a fairly large piece of furniture--primarily designed for scrapbooking, which I decided could go. I had a standard ironing board and used two tall bookshelves that came (and stayed) with the house in Virginia. The only other items were the Ikea Trofast toy storage units that I was using to store my fat quarters.
I had two of them in the closet of my sewing room in Virginia, but I'd bought another before we moved.
This is going to be our "forever house." This sewing room would be the only opportunity for a "dream" room, so I wanted to make my dreams come true, as much as possible. I've always done things on the "cheap" as much as possible since I knew nothing would be permanent. Now, permanance is a factor, so I was prepared to up the budget a bit. Not all the way to custom cabinetry and Horn cabinets, etc., but enough to get what I wanted most.
I had lots of ideas and lots of "dreams." I have a huge Pinterest board covered with ideas for a sewing room. I bought one of those "How to Design Your Sewing Space" books, and read through it. But before I went crazy, I decided to list what it was that was most important to me. Number one by an easy margin is LIGHT. I don't know if it's my age, or just how I'm "wired" but a bright, light space is essential. My room in Virginia was huge and had two windows that let in so much morning light, but by late afternoon and after dark, it wasn't a fun place to be. No matter the size, arrangement, contents, project: if the room is dark and gloomy I'm not going to want to be in it.
The second essential was also easy. STORAGE. In that huge room in Virginia, I didn't have much of it. It seemed whenever I needed something, I was digging. I had bins of fabric in the closet that I would have to haul out (because what I needed was always in the bottom of the stack of bins.) I wanted all of my fabric and supplies to be available where I could see it, grab it, and use it. I have lots of pretty things that have been gifts and I want to be able to display them.
I wanted a cohesive color scheme. I didn't want a hodge-podge of wood finishes. I wanted a great color on the walls and an accent color. The woodwork in the entire house is oak. The baseboards and doors in the sewing room were oak and while I briefly considered painting it all, that didn't last long. The trofast units and my island are white laminate. I decide whatever furniture or cabinetry I chose would also be white laminate. I also wanted a space for my great-grandmother's treadle machine, which is oak as well. My favorite designer, Sarah Richardson, says that you can have different finishes in the same room as long is each is repeated, so I was good there. For color, that was sort of easy, too. Since I like bright, light rooms, I wanted the walls to be yellow.
Have you seen this commercial for purple paint?
I love it! It precisely describes my desire for the perfect yellow paint. I want it light but not too bright. I don't want a "goldy" yellow or a greenish yellow. For me, the perfect color came down to Glidden's Early Morning Sun.
My accent color would be red, of course. Maybe some of you are wondering, "What, not red, white, and blue?" While that color scheme is everywhere else in my house, I decided that I would go with what speaks to my creativity in my sewing room.
Now that I knew my desires, it was time to start implementing them. Now it was time to scour the ideas. The lighting in the room comes from a ceiling fan mounted in the center of the room. I considered having an electrician put recessed lights in the three corners of the room (not the corner with the door.) I also am considering replacing the ceiling fan with track lighting, but decided to wait on all of those until the contents of the room were in place.
Having a bit of a budget and knowing I wanted white cabinetry, Ikea was an easy choice. I browsed blogs descibing other sewing rooms and the Ikea website and finally decided that Billy was going to be my new best friend.
The line of Billy Bookcases at Ikea have different heights and two widths, and standard and a narrow. This corner configuration has three standard widths and one narrow. I wanted to have 2 of these "L" shaped units (one like this and one reversed) having their short ends framing the window, and the long sides wrapping around to the side walls. I was concerned that there wouldn't be enough wall space on each side of the window, so I made up a floor plan out of graph paper and cut out the pieces of furniture to scale. I wish I still had them to show you, but I think I may have thrown them out. Anyway, based on the measurements on the website, they would fit! That meant I would have 6 wide shelves and 2 narrow ones to fill with fabric and other things. They were available in the standard height of 79.5" or you could add an extension shelf to the top to make them 93" high. I decided to do that.
The rest of the plan was to place my cutting table/island in the middle of the room with one short end 4 feet or so in front of the window. In front of the window, I would place the treadle machine. I planned to tuck the Trofast fat quarter storage units underneath the island on one side. That would leave plenty of clearance between each long side of the island and the long side walls of the room. Each side wall would have the long part of the "L" shaped Billy unit. The rest of the long wall that ended at the closet would have my sewing table/desk and the rest of the long wall that ended at the doorway was going to have a design wall with a rolling, ironing table in front of it. Pinterest is full of ideas to make them. This is one example.
The only other decision was what to do for a sewing surface. I really wanted a place for 2 machines. Since I got my Juki to do machine quilting, I like to have it set up so that I don't have to move my Bernina out of the way because if things are difficult, I'm not going to do them. It would also be nice to have a place for a friend to come and sew. Between the end of the Billy shelves and the corner of the wall, I had about 79 inches to play with. Ikea has lots of desk options: many table tops that can be placed on top of different types of bases. Again with storage in mind, my other new friend was Alex.
These are Alex bases. Both are available in white. I wanted three total: one each of the drawer units on the end and the cabinet version in the middle. They had a table top that measured 78 3/4" by 23 5/8 wide.
When we finally closed on the house, we had a couple weeks before our household goods arrived. I spent most of that painting. Once I finally had access to the room, I remeasured and checked everything over. Then I painted all of the rooms that I needed to before the stuff arrived. I finished on a Thursday and we were expecting the shipment on the following Tuesday, so on Friday, I picked up my daughter in Indianapolis with my husband's truck and we headed to Ikea in Cincinatti. My plan was to get all of the pieces I needed and we could spend the weekend putting them together so when the stuff came, I would have a place to put everything when I unpacked. Partway to Ikea, though, my phone rang. It was my husband calling to inform me that they were delivering on Sunday! That meant Friday was already committed and Saturday we would need to move out of the apartment, and Sunday deal with the movers!!! There was nothing to do, though, but continue.
It was my daughter's first Ikea experience so we had lots of fun looking. She fell in love with some of the stuff. I had my list. When we finally got to the end, where you get everything, I'm not sure just how we managed, but we got all of those heavy Billy boxes, the Alex boxes, a red office chair for me, a different chair for her, plus other stuff. It took both of us to move the cart and to pay and get it outside and loaded, but we managed. I'm an Army wife and she's an Army kid and so we know how to get things done! I dropped her back off in Indy and met my husband at our house where he helped me lug all of those same heavy boxes off the truck and upstairs. It was only 7 PM so we started assembling. We got one of the wide Billy bookcased together and put it next to the window. We did a narrow one next and used the brackets to situate it diagonally, which makes the right angle. BIG PROBLEM!!
The measurements for this unit on the Ikea website are wrong! They give one side measurement as one wide bookcase and the other side as two wide bookcases. They discount the angled narrow bookcase all together. Neither of these "L" shaped units would fit. I was so tired and upset that I wanted to cry. We thought things over and did some big-time problem solving. We realized we could pull out the narrow bookcase and just butt the wide bookcases together. This worked perfectly on the corner of the wall which would also have the design wall, but in the case of the wall that also had the sewing desk, it was going to be about 2 inches too long for the sewing desk to fit. Grr! It was already a bit on the short side for me to have two machines, so I wasn't too happy. We decided to switch out the second wide bookcase for the narrow one that we already had together. They are no longer symmetrical units, but at least I have maximized my storage. So you can visualize it: each side of the window has one wide bookcase. One one side of the room, there are two wide bookcases forming the "L" and on the other side of the room, it is one wide and one narrow bookcase forming the "L." We had one wide bookcase and one narrow one to return, so we shoved them aside. It was after midnight so all of the rest of the assembly would have to wait until we were on the other side of the move and unpacking.
One thing I did notice right off was that those tall, white, Billy bookcases really helped reflect light and the room was brighter with them in! I'm really glad I went with the white finish. Once the house was unpacked and I had a chance to work in my sewing room, I first did as much unpacking as possible. Luckily, I could take things out of boxes and put them on the shelves. Once the majority of the boxes were out of the room, we had space to work in again, so we next assembled the Alex bases and set them into place. I took the table top that I'd purchased and put in on top. I wasn't happy. The first issue was that there was now a gap of almost a foot between the sewing table and the edge of the Billy bookcase. I don't like gaps--they accumulate "piles" of stuff that should otherwise be put away. The other issue was that there wasn't much room for a person's knees between the Alex base cabinets. If I could have a longer table top, it would solve both problems: extending the table to fill in the gap, and giving more space at each machine. Another major drawback was that the table was narrow--not even 2 feet wide. I had almost 30 inches of clearance between the wall and the closet molding, so the table could be wider. I'm all about maximizing available space. A quick check of Ikea's website showed no table top that would work. I put the original on the pile of things to be returned and thought about solutions. With the gap, I now had 108" of available space for the table. I wanted it 28"-29" wide.
This is the end by the closet so you can see how 28" fits between the wall and the closet door molding.
I considered getting sheets of plywood cut, but wasn't keen on having the edge showing. I also considered MDF, but both ply and MDF are thinner than I wanted. I considered countertop again, but I'm not crazy on the backsplash "lip" that comes standard. Finally I decided on unfinished, undrilled core doors. You can't get a core door that is 108" tall, but 28" wide is a standard width, so we bought two and cut them down to 54" each. They would meet in the middle of the desk, where the Alex cabinet is, so that would work out okay.
See you them meet in the middle but are still fully supported?
The challenge was cutting down the hollow core doors, because, well, they are hollow! The right saw blade and a few instructional Youtube videos later, though, we had them ready. I painted them with a gloss white paint. Once they were dry, they fit perfectly! One additional thing that we did was to drill large holes through each door for cords. I bought cord hole grommets to give them a finished look.
See how "Professional" the grommets make the hole look?
Now I have a 28" wide table top, but the Alex bases are only 23" wide. That was no big deal, I brought them forward so that they are flush with the front of the Alex bases. Meanwhile, we screwed 1x2 boards into the wall for the back of the table top to rest on--to give more support.
The 1x2 is the unfinished board right under the table.
Because the Alex units are pulled forward, there is almost 5 inches of space behind them. I'm keeping my power strip and all the cord mess tucked behind them. Here I pulled it into view for the picture, but I shoved it back to the right so all of that mess is hidden, but easily accessed! I love that--I hate cord messes!
Okay, then. I thought I had all the kinks worked out, but now that the table was all in place, it was time to reassemble the cutting island. We managed that just fine. My plan was to slide the Trofast units underneath. Another big problem!!! They were too tall. I had them in the closet in Virginia, so I tried to put them here, but the closet is full of organizers, so they wouldn't fit. Grrr! Why am I always running into these problems?!! The only alternative was to put them against the other long wall opposite the sewing desk--where I was going to have a full-length design wall and my neato ironing board/cart. I thought I could find another place for a design wall, but where would I have my iron?
One idea that popped into my head was to have a padded cutting table like Lori Holt of Bee in My Bonnet. You can see her tutorial here. I mentioned this idea to my friend, Janice, but she wondered if cutting on a padded surface would cause problems with accuracy. I read the tutorial and realized with just a thin layer of batting, it wouldn't be too cusy, so I decided to try it. My next problem was that the top of my cutting island was comprised of a laminate countertop and I considered replacing it with plywood, but instead I went ahead with using the countertop. If I have a problem down the road, I'll re-think but for now it's working. I followed her tutorial exactly, only I used Insul-Bright batting instead of Warm and Natural. For the top fabric, I wanted a durable duck cloth weight fabric and looked in the home dec area. I found nothing in a pretty red color. Grrr. I scoped out the home dec remnant/clearance section and found something. It was still a bit high, so I asked if I could use a coupon for it. The answer was "no." However, they would have a 20% off your total purchase coupon over the weekend for Veteran's Day, so I waited a few days. Not only could I use the coupon, but those home dec remnants were marked 50% off. I was so glad I waited. I also got the batting and the silver ironing board fabric at the same time and saved a ton of money. Then I spent an afternoon with the staple gun, crawling around on the floor, upholstering the cutting island in three different layers. The finished surface looks great and so far I'm thrilled with how it is working.
I came up with a solution to the design wall issue which I blogged about in January. I put the design wall on the closet doors. So far it is working out great! The panels are easy to move if I need to get into the closet. The next undertaking was to rethink the fabric storage on the shelves. In Virginia, I folded fabric around my ruler and stacked in on the bookcase, but the Billy shelves are a bit narrower, and having the overhang at the front of the shelves was bugging me, so I decided to try wrapping the fabric around comic book insert boards to make little bolts of fabric and then stand them up on the shelves.
I love the way the look! More importantly though, I've had a chance to pull them out and cut off them and put them away again, and it is really easy. I started out getting 3 packs of 100 boards, thinking that would be plenty. Then I got another 100. And then 2 more. Yikes! I still have an unopened package, though, and I think I'm done for now. Anything over a fat quarter gets wrapped around the board and pinned. If there is quite a bit of yardage, I use two of the cardboards. If you are interested in how this works, just search for "comic book board fabric storage" and you will find lots of information and videos.
Next time will be the big reveal! You can see how it all looks, and I'll show some other projects from the room. I can't wait to show it to you. Until then, here is a peek inside from the hallway.
I realized that a blog post about my new sewing room would be gigantic, as there is lots of thoughts and photos that I want to share, so I'm going to break it down into three separate posts:
Let's go back to August. Our offer on this house was accepted on the nineth and we weren't going to close until the end of September, so that left me lots of time to plan, and I spent most of it planning my new sewing room.
The first decision I had to make was where to locate it. There are three bedrooms upstairs and also a huge, finished basement. The trouble with the basement is that it is one large, long room with an office, storage room, bathroom, and furnace room opening off. It is plenty bright as it is a walk-out, so that wouldn't be a problem. It's just that I couldn't section off a spot easily. One end had the door to the office and was right at the bottom of the stairs, and the other end had sliding glass doors outside. Neither would work, so I shifted my attention to the bedrooms upstairs.
The pictures I'm going to share here are the only ones I had at the time. They are from the listing and the furniture, etc. belongs to the previous owners. Yes, I neglected to take pictures while we were looking. I did in the beginning of our search, but as my focus on the houses intensified, my attention to the camera diminished.
The first bedroom faces the front of the house and has a spectacular arched window. I thought the window would add lots of light.
The major drawback is that this is the smallest of the bedrooms, and I really didn't think I could fit in everything I wanted.
The other two rooms are side-by-side at the back of the house. The first belonged to a college-age daughter.
You enter the room through the door, the window wall is on the far wall, and the closet is on the same wall as the door, extending to the right.
The other room is just the same but flipped so that the closet extends to the left of the door, This room was decorated for the couple's baby granddaughter.
Since the front bedroom was much smaller, I focused in on these two rooms. I had some approximate measurments that were on the listing, however, it just gave the room sizes, it didn't say which room was what size. Just for your information, the small room is 11x 12.5 feet and the other two are 14 x 12.5 and 14 x 13.5.
I didn't necessarily want the biggest room, for me the layout was more important. I could tell from the pictures above that the window walls both had the window centered, with maybe 45" of wall on either side. The side walls in both rooms had no doors or windows, but what I wasn't sure about was the closet walls and how the door into the room impacted the space.
When we had the home inspection, I went back with my camera and a measuring tape. I had a list of measurements I wanted to take, (primarily for the refrigerator as we needed to get one) so I took more pictures of the upstairs rooms.
This is the door/closet wall of the college-age daughter's room. You can see that there is a step-back from the door. The corner isn't shown, but the closet door ends with less than 5 inches of wall before the corner--that means that if I want to have a solid wall of shelves, etc. in my sewing room, this room won't work because one wall has the closet, one the window, one would have the door in the way, and the other doesn't have enough space at the end of the closet. It's hard to explain, but maybe you can visualize it.
The baby's room had an ideal layout.
You can see that the closet door ends and there is about 29" of wall before the corner. This means that the wall with the crib on it could be entirely filled with cabinetry.
This last photo captures where the doorway is postitioned. Once I scrutinized both rooms, it was very clear that the purple room would be my sewing room. It was also very clear to me that it wouldn't stay purple and pink!
Next time I'll discuss the planning phase. What were my needs and my wants and how it all came out.