Pages

Monday, December 31, 2012

A Whale of a New Year

Happy New Year!

I have been really enjoying all the blogs lately that share either last year's projects or this year's goals.  New Years is generally a time for reflection, but for me it is usually a time for purging.  This year I have company, and so I'm doing other things.  Today we went whale watching off of Virginia Beach and we saw two Humpback whales!  My husband and I were with my parents, and whenever we go whale-watching, we always have good luck.  A few times we even had "dream trips" where even the boat staff get excited!

I thought I would share some of today's photos:


When you whale-watch, you are on the lookout for this--blow.  It is often the first clue you have that there is a whale in the vicinity (unless you are extremely lucky and you see a breach--where the whale leaps out of the water.)  Can you see that some of the blow goes straight up and some goes off to the side?  This forms a distinctive "heart-shaped" blow which immediately identifies this as a humpbacked whale.  It is formed because humpbacks have two blow holes right next to each other--you can see both in the picture.


The other way to easily identify the species is because it has, er, a hump on its back--hence the name.  Did you also know that Right whales were named thus because they were the "right" whales to hunt back in the whaling days?  No kidding.  I don't think I will inquire how the Sperm whale got its name...


This photo is not cropped!  That whale got really close to the boat!

 
I love this photo because I got the whale with the two Cape Henry Lighthouses in the background.  The shorter one is the original.  It was constructed in the 1780s as the first lighthouse built under the new American government.  In fact, George Washington himself appointed the first keeper.  It cracked in 1870 and so they built the "new" one--the taller one on the left.  If you visit, the old one is open to the public and you can climb to the top.  We did so back in August.  It was hot!  And sweaty!

Back to New Years...   I have lots of projects in mind for the New Year.  I am really making 2013 the year of the Unstarted Project (USO) and have several of them on deck waiting.  USOs are projects for which I have the pattern and the fabric but have never started.  Once I went looking, I was amazed at the projects I discovered "hiding" in my quilt room.

I also have a resolution.  I don't believe in making traditional resolutions--where one makes unrealistic, usually unpleasant goals for the New Year that are  history by March.  I like to make fun resolutions.  This is mine:

 
Three cones of thread, each having 2500 yards.  That makes 7500 yards.  There are 1760 yards in a mile.  7500 divided by 1760 equals 4.26 miles of thread.  My resolution is to use it all this year!  Do you think I can?  I'm sure going to have fun trying!  Tomorrow before I do any more sewing, I will take off my current thread, wind new bobbins from this, and thread the machine and begin.  Because of my company, I'm falling behind on Easy Street and it is really bothering me!  But, I'm so excited to see how it comes out!

I would like to wish you all a sincere Happy New Year!  As I'm writing this, it looks like a deal has been made to avert falling off the Fiscal Cliff and hopefully Sequestration as well, so perhaps all of our chances for a prosperous New Year are as good as ever.

JoAnne

Sunday, December 30, 2012

Pinnies From Heaven

Hi Everyone,

I'm back!  I've been busy traveling and finishing holiday preparation but I'm home now, although I have company for a few days. 

This is a bit of a sad post as it is the last Schnibble of the year for Sinta and Sherri's Another Year of Schnibbles.  I managed to make (and finish!!) every project for the year except for June's (I have an excuse--I was moving from Hawaii to Virginia and was sort of homeless for nearly a month.)  I promised myself that if I was going to participate I needed to do every project, not pick and choose.  I love all of them!

This month's project was do make a pincushion (a pinnie for short) using Carrie's new pattern, Morsel

Image of Morsel ~ Little Bites PDF

I wasn't sure about this one.  I had never made a pincushion before, but I do follow Carrie's blog and had read her tips about making them, so I armed myself with a bag of crushed walnuts from the pet store (for stuffing) and proceeded.

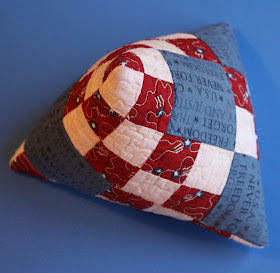
The first one I tried was the pyramid.  It's shape really looked fun.  I decided to do it in patriotic fabrics since they are my favorite.

I'm sparing you the photos of crushed walnut shells spread out all over my cutting mat.  In part because it was such a mess and also because I was so busy trying to hold the pinnie, use a funnel for the shells, and TRY to get them inside, that I didn't have a free hand to take photos!  It actually wasn't so bad once I got a technique going.

It turned out a bit wonky, but I LOVE it.


I used Carrie's diagram in the pattern for putting in random larger squares along with the pieced 4 patches.  I had no idea which way was "up" or how the thing would come together, so I put them in every which direction.  I love that they are all wonky.


I quickly discovered what other pinnie creators know:  you can not possibly stop with just one.
 
 
I went through my Scnibble "leftovers" and found bits of the Collection For a Cause:  Friendship, and moved on to the other versions.
 
Earlier in the month, I posted here about how you can print your own twill tape.  I found a friendship-themed saying I wanted and ended up with this pinnie:
 
 
Love the red buttons!


For the background of these, I found a wool Liz Claiborne blazer at a local thrift shop for $2 and brought it home and felted it.

 
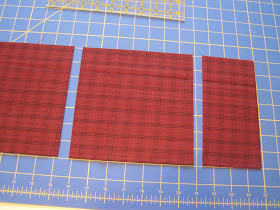
I had not done that before, but it was pretty interesting!  I love the neutral plaid.

I made another, again with a selected sewing quote, but this time, I wrote it onto my background fabric with a pigma pen.  Okay, I didn't "write" it, I traced it from a printout using a nice font.  It ended up being a bit large for the piece, but I still like it.


I had the brown "stitched" ribbon in my scrapbooking stash and it was perfect for the project.

Before I stuffed any of these pinnies, I "aged" the quilted pieces.  I soaked them in tea, dryer dried them, then dampened them and worked them in my hands like clay.  I would crumple them up and then iron them flat repeatedly until they were softened and aged. 

I also attempted the round pinnie, but after I got all the clips made all around the seam allowance and turned it rightside out for stuffing, I discovered a hole in the seam.  It was right in the middle of Christmas prep, so I just threw it out!

I have had so much fun doing these projects this year!  I can't thank Sinta and Sherri enough for hosting!!  If you want to see a review of my project, just click on the "Another Year of Schnibbles" tab at the top of my blog.

Have a great day!
JoAnne


Sunday, December 23, 2012

Easy Street Part 5

Hi Everyone,

I was looking forward to the next clue that Bonnie would be releasing Friday morning for her mystery Easy Street and it was there when I woke up early that morning!  She said that there would be no more flying geese!  I wouldn't mind any more, as the technique is pretty speedy for me, but variety is nice, too.

So, we were to cut 64 3.5" squares and 128 2" squares.  For my color way it was still working with navy and medium blue!  Luckily I really like the combination but it will be fun to start adding the red into the mix!  So I cut the 2" squares from my medium blues--I think I've been exclusively using 2" strips from this color, so it was easy to pull out leftovers and to cut more.  I'm hoping there won't be much more from this color family as it is starting to get a bit skimpy.  Then I needed to cut 3.5" squares from navy, and again I wanted LOTS of variety, so I pulled navy blues that I haven't yet used and I only cut two squares from each fabric.

Bonnie said she has never used the unit we were to make in a mystery before.  I may have made some of these in the past, but I don't remember specifics.  We were to draw a line diagonally across the small square and do the "stitch and flip" technique of adding triangles onto squares.

There are lots of different ways to do that technique including ways to avoid drawing the line by using the Angler 2 or other ways, but I decided that I wanted the accuracy of drawing the line, so that is what I did.
 
I'm guessing that many of you know that it makes life easier to put the pieces on some sandpaper so they don't slip.  I made this "board" out of a heavy peice of cardboard with two sheets of fine-grade sandpaper taped on it.  I've had it for years and love it for projects like this.


You can move the ruler  and draw the lines without the pieces shifting all around.

Once the lines were all drawn, we put one square on top of the larger square, matching a corner and stitching right next to the line--not right on top. 
 
Then the square is pressed over into the corner, so that the unit looks like the above photo.  If your small piece lines up perfectly with the navy square, the corner of the navy square and the "waste" of the medium blue can both be trimmed away.  If it isn't quite perfect, just trim the medium blue bit and leave the navy square intact so that you have an accurate 3.5" square when you are finished.


Next, we did the same thing in an ADJACENT corner.  I'm remembering that for a recent Schnibble-- the Xs and Os one, we used this technique in opposite corners.  If you do all corners, you will have a snowball, or square in a square block.  But we are making these "house" units.


Sew on the edge of the line and then press to the corner and trim away the seam allowance.


They really make a nice house-shape, or fat flying geese, etc.

Since Friday was my day to get laundry done and packed and the car loaded to leave early Saturday, I gave myself until noon to get as many done as I could.  I ended up finishing them all before 11 AM.

 
All done!

I want to wish you all a very, Merry Christmas!
JoAnne

Wednesday, December 19, 2012

I've been swamped

Hi Everyone,

Whew, I've been busy, busy, busy, like most of you.  Baking cookies, going to the Post Office, grocery shopping, wrapping packages, running out for last-minute stuff, it goes on and on.  Luckily I had Bee today, so I got some stitching and fellowship in.  Tomorrow I have a luncheon and an evening party, then Friday the new Easy Street clue comes out and I plan to get it done because Saturday AM we are leaving for a week for Christmas. 

I finally got both Bounce and Hubble bound and washed.  I was hoping for a sunny day to take some nice photos, but no such luck on Sunday and Monday and I wrapped them Monday night.  Predictably, Tuesday was sunny, but oh well.

 
Bounce on my twin bed.  Both quilts are "full" so they are big on the bed, but you get the idea.


Bounce's  blue striped binding and green flannel backing.  I had both quilts backed in flannel--they are extra cozy that way.

 
Hubble.

 
Hubble's pink striped binding and backing.


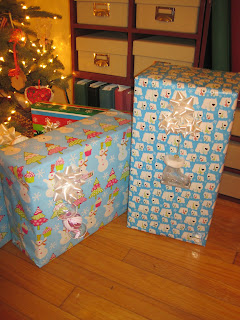
I managed to cram them into reasonably-sized boxes for wrapping.  Hubble is on the left and Bounce is on the right.  Can you see the tie-ons?  Hubble has a pink piece of candy ornament and Bounce has a clear/white ice skate.  (Alex the ice skater is the recipient as you may recall.)
 
 
When I got home from Bee this afternoon and got the mail, I squealed with excitement to see a package that came all the way from Derbyshire, England!   It had this card.
 
 
Isn't it so British!!  I love it!

 
And this cute stocking ornament.  There is also a wrapped package that I'm waiting to open at Christmas.  They came from my good blog-friend Melanie at the Patchwork Robin. 
 
 
I know that I will be blogging about Easy Street by Monday morning, but I'm not sure how much else I will be doing.
 
Have a great day!
JoAnne


Sunday, December 16, 2012

Easy Street Part 4

Hi All,

Friday morning Bonnie released the next step in Easy Street.  More flying geese and some cutting.  The geese were easy enough, it was the cutting that took the most time for me.

Friday morning it also became abundantly clear to me that my cell phone was on its last leg and I should get a new one before the old one died and I lost stuff.  I got one Friday night and it has been a frustrating weekend for technology, believe me!  We even had to stop back in the cell phone store today to get some questions answered.  It is mostly my own fault--if I had just got the newer version of my old phone, it would have been pretty easy, but nooo, I had to switch phone brands, systems, etc.  Ugh.  Anyway, it is my own fault and I should be functioning more or less back to normal soon.  (I hope.)  What is it about getting a new "smart phone" that makes me feel so dumb?  When you factor in the fact that my home email wasn't working all weekend, too, it just hasn't been a technology-friendly few days.

Luckily I could escape to the quilting room where everything was normal and intuitive!!  I began by cutting the pieces for the flying geese.  I had leftovers from before, both cut and in strips, so that didn't take too long.  I was a bit nervous though with my color selections.  More blue and blue units.


I'm trusting my choices though and am reminding myself that it will turn out to be sensational!  I like these units.  They look like chevrons or little arrowheads!

The cutting involved red fabric.  I'm also working on and off on a quilt for our new king-sized bed and for it I also needed a big variety of red.  Bonnie said to use as much as possible, so I decided to go through my red bin and cut as much fabric as possible. 

It worked out really neat to cut for both projects at the same time.  For the king quilt, I needed 7" and 4" squares.  For Easy Street I needed 145 3.5" squares.  This is what I did.

I got out the pieces of fabric (mostly fat quarters to half yards and smaller "chunks.")  I pressed them and layer 4 pieces at a time.  Here you can maybe make out the four different fabrics.

 
I straightened the edge and then cut a 7" strip.  The width of the fabrics is about 18" plus or minus an inch here or there.


So that gave me a strip 7" x 18" (or thereabouts)


So I turned the strip and cut two 7" squares.  Seven twice is 14", so that left a chunk left over that is 7" x around 4"
 
 
I trimmed that chunk to 3.5"  Now it is 7" x 3.5"
 
 
Then I cut it in half, giving me two 3.5" squares for Easy Street!  No waste!  I LOVE THIS!
 
 
Next I cut a 4" strip off my layered pieces and subcut into the 4" squares that I also need for the king quilt.

I was able to cut for two quilts in roughly the same time as it takes to cut for one!   I got out 70-75 different fabrics, pressed them, cut the pieces, and folded up the rest of the fabrics and put them away, and I only had to do it once for both projects.  I only cut two squares from each fabric for Easy Street, so I will really have a variety!

Boy this next step is the one that hope is easiest!  We are leaving Saturday morning for Christmas and won't be back til the following Friday, so I have to get the next step done on the same day so I can link up next week! 

Have a great day everyone!
JoAnne

Friday, December 14, 2012

This Week

Hi Everyone!

I had one simple goal this week.  To bind Hubble and Bounce.  I've been working on them off and on (Hubble is done) but other things keep cropping up.  

Monday I had a cookie exchange here at my house.  It was fun and we had potluck lunch.

Tuesday I decided to reorganize my quilt room.  In the evening was our night chapter of guild.

Wednesday I got bitten by the pincushion-making bug.  I'm still obsessed, by the way.

Thursday I had "lunch out" with the spouses' club.   We went over to Smithville (home of the ham and other porky items.  Yes, I had a pork sandwich for lunch.  It was called "pork and pinot" and featured pork tenderloin, blueberry, and pinot in an wrap.  It was scrumptious!)  They also have quaint shops including several antique shops (they have great prices!)  Anyway, that burned up a major part of the day.

Right now, the island in my quilt room is a total disaster.  There are bits and pieces of scraps, buttons, thread, twill tape, ric rac, etc. all over from my pinnie making. Plus crushed walnut shells are scattered everywhere as well.  And Easy Street part 4 came out this morning. 

I'm off in an hour or so for morning guild.  We are having a mug rug exchange.

Presents aren't wrapped, cards aren't done, yikes!  Oh well, there isn't much on the calendar for next week.  I'm not panicking, but I sure need to focus myself and not get distracted any further!

Have a great day!
JoAnne

Thursday, December 13, 2012

Tutorial to Transform Twill Tape

Hi All,

This month the Another Year of Schnibbles participants are working playing with Carrie's new Little Bites pattern, Morsel. 


You can find the pattern here at Carrie's store.  Can you see that the two rectangular ones on the top right use twill tape?  You can find preprinted tape in some sewing/quilt shops, but your best bet would be a scrapbook store or department.  There are lots of fun ones out there.

But say that you can't find something "just right" or you don't have a store nearby, or you are working away and it is 2 AM and nothing is open and you HAVE to finish your pinnie to write your blog to send to Sinta and Sherri for the parade in a few hours because it is the last night of the month!  In any of these cases, I have a fun solution for you.

Caution:  This technique is NOT permanent.  Water will ruin it.  I don't think you plan to get your pincushion wet, but if you do, don't use this technique.  If you want to try this, don't forget to "age" the front of your cushion BEFORE you sew your tape on it.

If you still want to proceed, you will need a few things.  One is twill tape.  I happened to have some in my scrapbook stash.  It was not plain.

 
As you can see, it has doggie paws on it.  Cute, but not the look I was going for.  But guess what?  The back is plain.  And I paid just as much for the back as I did the front!  I'm going to use it. 

But you are thinking, "Hey, it is 2 AM and I don't scrapbook!"  Never fear, perhaps you have some of this laying around?  I know I do!

 
Guess what?  This is twill tape and the back of it is plain, too!

Next you need help from your computer.  I like to use Powerpoint, but you can also do this in Word.  Open a new document and type in the phrase you would like to have on your twill tape.    I like to use Powerpoint because you can do a "landscape" document.  For this pinnie, the length of tape you need is right around 8 inches, so you can do it "portrait" style with 8.5" wide paper in Word.

Once you have typed in your phrase, start playing with fonts.  Also adjust the size of your font  so that your phrase will fill the length of tape that you need.  I like to copy the phrase several times so I can manipulate them differently and tell which one I like the best.

Here you can see some of my examples.  The top one is all in the same font.  The second one is the same font, but I changed the size of some of the key words.  The third one has all the same font but I've bolded the key words and the last one (my favorite) uses a different font altogether for the key words, plus the size is larger and it is bolded (though you can't really tell, because the font is thinner for those words.)  Play around with this.  There are some great standard fonts.  Because I am a scrapbooker, I have some cool fonts that I bought (including these) but there are also some great free ones availble.  Manipulate until you find something that you love.  When you are happy, go ahead and print out your examples. 
 
You will want to measure them to make sure they will fit your project.  If it is too long, just go in and make the size of the font smaller.  Also make sure that the print isn't too small.  If this is the case, you may need a shorter phrase.  Are the letters too big for the width of your tape?  If so, adjust for that.  Once you have the one that you want and you like it, save the document, then delete all of the examples except the one that you want to use and print another copy--this page will just have the phrase that you are wanting to use.  (You just saved all of them, so it is okay!)  Believe me, you don't want those extra ones getting in the way.  Experience has taught me well!
 
Next I like to draw lines with my ruler representing the width of the tape that I'm using.  This will ensure proper placement.
My tape was 1/2 inch wide, so I drew lines along the top and bottom that were a half inch apart, centering the text in the middle.  I like to make the vertical lines about a quarter of an inch from the beginning and ending of the phrase.  This is for reference--the tape will be longer on each side, but once you proceed, you can't see where the phrase starts or stops.
 
Next, put double-stick scotch tape all the way down the paper, right over the top of the phrase, keeping it within the space where the tape will be.  Carefully stick the twill tape on top of the sticky tape.
 
Do you see how the left edge of my twill is sort of sticking up?  NOT GOOD, I didn't notice this when I was working and it flopped.  You want a nice, clean edge to your twill tape and make sure that it is stuck down really well!  When I did the second attempt, I actually used a tiny strip of regular scotch tape to tape that end down. 
 
Remember that I'm using Powerpoint here.  If you are using Word, your phrase/tape will run across the short side of the page, not the long side.  Do the same prep and it will be fine.
 
Figure out which is the leading edge of you printer, and put that edge into the printer.  The idea is that you are going to run this sheet back through the printer and you want the phrase to be reprinted right on top of the original.  In my case, the left side is the leading edge and that is why I made sure that end was stuck down firmly.  (If you can't remember or are unsure, run another piece of plain paper through to see which side comes out of the printer first--again, I've been there!) 
 
 
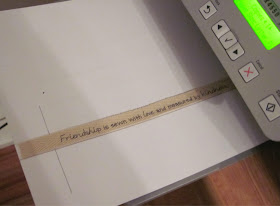
It is a huge help if you remove all the blank sheets of paper from your printer.  See how my paper is in the printer just as if it was any old sheet that would be printed?  Don't worry, the printer will work fine (unless you don't have your tape firmly stuck down.)

Click the print button....

...and Voila!

The sheet and tape get printed on, right over the top of your tape, centered perfectly because you measured and made the guidelines!  Isn't this cool?!!

Now just take the sheet back to your work area and remove the twill tape.  It should come off easily.  You can now cut another length of twill and repeat to get as many custom printed pieces as you want.  I went ahead and reprinted on the wider, Moda tape.

**Remember, delete the extra phrases and then print your "working" page with just the phrase you want!

**Also remember not to sew this tape on until you are done aging your piece.

When I made the front of my "morsel,"  I knew I wanted to age it, so I did a tight zigzap over where the two pieces are overlapped.


You will sew the twill tape over the top, so it won't show, but will keep that seam together while you age.  I tea-dyed this, threw it in the dryer, then spayed it with water to dampen it again, and wadded it up and worked it in my hands like a piece of clay.  Every once in a while, I would press it dry and then dampen it again and repeat until it was nice and soft and "aged."

When I laid the twill tape over the seam, the twill looked too new!  Not a problem.  There are distressing inks also in the scrapbook store.  This one is called "antique linen."

 
Using a dauber, or a cotton ball apply the ink just to the edges of the twill tape.  (This example is the Moda tape--see how it is wider?  I forgot to photograph this step with my narrower tape, but I did the same thing to it.)

 
Just keeping it along the edge!  It is also a good idea to keep it on the paper, as you will get ink all along the edges.  When done and you move it, it should look like this:


You can see the "over inking" and when you look at the twill tape, you can see that the edges of the tape are now "aged"  (okay, they look dirty--same thing!)

Just to prove that I recycled the twill tape:


Now that the front of the pin cushion is all aged and dry, just stitch the tape down and trim.

 
Now it is all ready for buttons and then it is time to sew it to the back, turn, and fill.

I hope this tutorial inspires you!  The possibilities are endless--you can personalize with a name or any appropriate phrase, scripture, etc.

I believe there are chemicals which will make the printer ink permanent, but I don't know exactly what they are or how to use them.  If you do, please leave a comment about it!  Also feel free to ask any questions as I may have left something out!

I hope you try this for your next Morsel!  If so, please send a photo!

Have a great day!
JoAnne

PS:  I couldn't help but have fun with the title of this post--I LOVE alliteration!

Wednesday, December 12, 2012

Unplanned Day

Hi All,

Did you miss me yesterday?  I had every intention of posting.  I also planned to bind Bounce and Hubble.  Somewhere along the way my day took a different plan.

How are your Christmas preparations coming?  I'm hearing from a lot of stressed people out there.  I'm not so bad.  My cards aren't done yet and I've yet to begin wrapping, but I'm feeling okay.  I wouldn't say that I have piles of extra time, though, so what I did yesterday was impulsive.

It all sort of began on Monday.  I started working on Hubble.  The pattern I selected for the pantograph quilting on it left some open areas along one side, so I was planning to do some free-motion quilting in an approximation of the pattern to fill in.  I didn't have the right color of thread, though, so I made a trip to JoAnn fabrics.  I got the thread (and a bunch of other stuff, too, but I ended up saving more than I spent--love that!) and while I was wandering around checking things out, I came across their selection of burlap.  Have you seen it lately?  They have some gorgeous burlap.  There is a red with a subtle glitter/sheen, the natural with lovely green designs, etc.  As I was goggling it, I remembered that in Hawaii, I had bought a burlap coffee bag.  Many boutiques there were selling nice purses/tote bags made with coffee bags, and I wanted to try something like it.  In JoAnn I was wondering if some of their gorgeous burlap would coordinate with my coffee bag. 

I came home and got working on Hubble, but in the back of my mind, I was thinking of the coffee bag.  I was wondering where it was...

I got the "fill in" quilting done and the binding sewn on.  I was excited that the line of fabrics (Good Morning by Me and My Sister) had a stripe.  I prefer to bind with a stripe or plaid if at all possible.  This one turned out great!

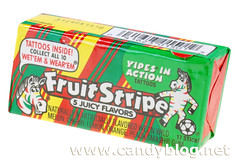
I kept thinking that it looked really familiar.  It was too pink to be like a candy cane, and that wasn't it.  The pink looked familiar.  Then I remembered.  It looks like a piece of this:

Fruit Stripe Gum

I haven't had it in years, but I remember it!

Anyway, I started hand sewing the binding down Monday night.  Yesterday I was to finish it and "fill in quilt" Bounce and bind it.  But I still couldn't get the coffee bag out of my head.  Where was it?  For the third time in about 10 days I was having trouble finding things in my quilt room.  I can not stand that!  So, I decided enough was enough and I launched into a reorganization.  And it was major!  The kind you think you need to schedule a day or two to complete, but it really just took most of the morning--up until 1 pm. 

When I set the room up, I delegated half the island storage to scrapbooking, and the other half to quilting.  I haven't touched the scrapbooking and have no huge desire at the moment.  So, I located an empty, large rubbermaid bin and proceeded to empty the scrapbooking drawers into it.  I did leave any tools I sometimes use--I just loaded up embellishements, etc.  I also had empty albums and page refills piled up on the closet shelf.  All of that stuff was taking up prime space that is easy to get to.  Now it resides in bins at the way back of the closet.  Since I needed to get to the way back of the closet to put it there,  I had to pull out most of the stuff I had dumped back there.  So I went through it all and purged some things.  Then I put it all back.  One of the things in the closet is a fairly large bin of fabric--my batik collection.  I decided to go through it and fold the large pieces and put them out on my shelves.  Have you seen me make many batik quilts?  Nope!  I spent the hour and half that I was folding it wondering just why the heck I had bought so much and what was I going to do with it?!!

I finished the batiks, and then I rearranged my quilting things into the new, available space, and tidied up.  Whew, I was done!  Hopefully I will be able to locate things now!

The coffee bag?  I didn't  find it.  In the quilt room.  I remembered that I had seen it in one of the closets in a guest room.  I found it in about 45 seconds once I remembered.

Have a great day!  I'm going to finish those quilts.  I hope!

JoAnne