Pages

Monday, October 29, 2012

Hundreds of Tiny Threads

First of all, I want to thank all of you for the good wishes for us in this storm!  It is still raining here, but the wind has not been bad today.  We still have power and water, which is a very good thing! Yesterday, my husband had to go in to work (even on a Sunday) because the Army wanted to ensure that they could still communicate.  I put on a pot of hot, mulled, apple cider and left it simmering all day, enjoying a cup whenever it seemed too gloomy or stormy. 

Today, most everything was closed down, but again, my husband drove in to work, although he got to come home just after noon.  I spent this gloomy day with all the lights on in my sewing room, the iron warming nicely, listening to my most recent book on tape.  Right now I'm working through the Inspector Gamache mystery series by Lousie Penny.  They are really very good--I highly recommend them.

But as to the real substance of today's post, do you follow Carrie Nelson's blog and if you do, did you see the post she made late last week with all her variations of her Little Bite's pattern, Tidbit, and the framed small quilt?  She generously shared the instructions, too!  I don't know about you, but I no more than finished reading than I was grabbing my purse, and heading out to find a frame.  I found one, too, and it was on sale!

Thursday night I was up in my quilt room, digging through my scraps, cutting 1 1/4" squares.  Then I got distracted by Sandy until today.  While the rain streamed down my room's windows, I worked away until I had this:
(I removed the glass for photography purposes)
 
I'm delighted with it!  I used a quote of my own choosing, although Carrie generously provided a PFD of hers in a choice of fonts, all printer ready.


In case you can't read it, it says "Chains do not hold a marriage together.  It is thread, hundreds of tiny threads which sew people together through the years." (Simone Signoret)   I love this quote because not only do I find it to be true, but it makes me think of all the times my husband picks off loose threads that I always seem to be covered in.  Hundreds in fact!  He seems to acquire his share, too. 

I'm keeping this version, but wouldn't it make a perfect wedding or anniversary gift?  Luckily, I didn't just buy one frame.... 

Back to Sandy, here is a photo I took in our yard this afternoon.  We actually had a small tree come down in the wind yesterday.  Can you see all the standing water?  It is a swamp out there, but we are counting ourselves VERY lucky.


Thanks again for the good wishes and to all of you who are just experiencing her or are about to, good luck to you!  I'm sending out prayers and good wishes.

JoAnne

Sunday, October 28, 2012

Sandy

Hi All,

I haven't been posting the past several days because we have been doing hurricane prep.  We brought all of our small, loose stuff into the garage, got some candles (we already have a hurricane "kit" so we were good on water and food, batteries, etc.--thank goodness we didn't have to visit a grocery store!)

We live just across the bridge to the north of Norfolk/Virginia Beach.  We are about 5-7 miles from Chesapeake Bay so we will not be affected by tidal flooding.  I'm hoping we don't have any power outages!

We started feeling the effects last night.  We already have over 2 inches of rain and wind gusts up to 43 mph.

We are going to stay in for the day!

The biggest bummer?  Someone had the "bright" idea and realized that the entire Megalopolis of the East Coast was now obsessively watching the Weather Channel.  What had been a political commercial "safe" zone no longer is...

I hope anyone else out there in the path is safe!  Also, I'm glad the tsunami that hit Hawaii a few hours ago was only a foot or two high!

JoAnne

Thursday, October 25, 2012

Other Things

Not too much quilting has been done this week.  On Tuesday, I had a day trip to the Williamsburg Winery with the Army Spouses' club.  Only 5 of us went, but it was a beautiful day and a spectacular setting.
 
The Merlot vineyard  (You can see that the leave are just getting started changing here)


As gorgeous as the day looks, it was.  It was a beautiful day.


This is the red wine cellar.  They two types are kept in different areas, and it was remarkable how different they smelled.  The white wine cellar was much more yeasty- smelling.

There are two restaurants on the grounds, one for lunch and one for dinner.  It was so nice that we ate outside. (I'm in the middle)
 
 
Yesterday I spent most of my time in the garage.  I have been working on painting some furniture the past couple weeks.  I got side-tracked for a bit, working on quilts, but the mess out there is driving me crazy.  So since we are having temps back up to 80, it is a nice time to work out there.  Have you heard of chalk paint?  That is what I'm using, although I made my own. 
 
Painting always seems like it is going to be easier than it is for me.  I'll get a coat on, and after it dries, I'll find a drip or something that needs to be sanded and redone.  Ugh.  It always seems like it is going to be much more fun than it is!  So far, I have both pieces painted, sanded (to distress), stained (to age) and now I just have to wax them.  There is a third piece that I would like to do, but it isn't going to get done until the next time it seems like it will be fun to paint!
 
I'll share photos later.  Of course, I forgot to take "before" pictures...  
 
I'm also off to get my flu shot today.  I know I will have the choice between the nose spray or the needle.  I always take the needle because not being able to blow my nose after that spray would drive me crazy.  How about you?  Do you like the nose spray or the needle?  Or do you avoid it altogether.  I would love to try the new tiny needle that is out there, but I don't think the military has it yet.
 
Have a great day!
JoAnne

Monday, October 22, 2012

Bounce or Hubble? Bounce AND Hubble!

If you remember, our Another Year of Schnibbles "assignment" for October was that we could choose to do either Bounce or Hubble.  Back a week or two ago, I shared that I was making Bounce for my neice, Alex.  At the time I was also planning to do Hubble, because Alex now has a step-sister, Vivian, who is also 7, but I wasn't sure if I would get it finished in time, but I did!

Since I was making both girls a quilt, I decided to use the same line of fabric for both--Good Morning by Me and My Sister.  I love the fun, bright fabrics that aren't too juvenile.  I think they will enjoy them for some time.  The variety of colors is nice, too.  Alex is moving away from the "pink and purple" phase, but those are still Vivian's favorites, and this line had all of the favorite colors. 

The scale of the fabrics also had an impact.  I already wrote a bit about the choices that were available in making bounce, and the fact that I used one large square for the center of the blocks, instead of piecing 4 patches.


I was happy that the larger-scaled patterns got a chance to show up instead of getting chopped up smaller as would be required for the 4-patches. 
 
I followed the same idea for Hubble.  The pattern shows making lots and lots of half-square triangles.
 
 
But again, Carrie has options.  At the end of the instructions, she said that one could just make the star shape from squares.  I liked that idea because it was quicker (I was making two bed-sized quilts after all) and also the fabrics could be showcased again, and not chopped up.


I spent one whole afternoon trimming the charm squares and laying them out in the star shape.
 
It actually took longer to lay out the star, ensuring that nothing too similar was too chose together, than it did to sew the squares into the star!


Because I was making both quilts larger, and rectangular, instead of square, as the pattern instructed, changes had to be made to both.
 
Bounce was fairly easy to modify--I just made more blocks to get it close to my desired size--80x88--and also adjusted the border width.
 
 
72 blocks make up this version of Bounce.  The background is a light blue solid.  I increased the amount of background that I thought I would need, but I had to go back to the store two more times to finally have enough!
 
 
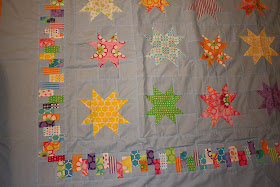
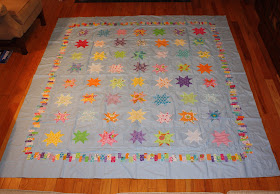
Hubble was a bit more challenging to adjust.  Carrie had three sizes we could do, by trimming the charm squares to different sizes, and so I chose the largest.  That still only gave me a larger star square.  I needed a rectangle.  I considered several options:  adding two more rows of squares to the star to elongate the star, to add rows of charm squares to the top and bottom edge of the entire quilt, or to just add more background fabric above and below the star.  The latter was the option I chose, and I'm very happy with it.
 
 
I love how the narrow border frames everything just perfect!  Hubble was the project that I needed to finish last week before I could tackle my class quilt.  The narrow inner border was also the border that my iron scorched!  Luckily, it is scrappy-pieced, and I had plenty of strips, so I just ripped off the scorched pieces, and added on more.  I really would have been unhappy if the wide, outer border had been scorched!  That would have been a disaster.  
 
I'm really pleased that the same line of fabric produced two such different quilts, but they still "relate" to each other.
 
Both quilts are now off to the long-armer to hopefully get quilted in time for Christmas! 
 
Have a great day!
JoAnne


Saturday, October 20, 2012

Iron Pt. 2

Well, the Rowenta is getting packed up and returned.  I filled it with water before reading eveyone's comments about irons lasting longer without water, and have been using it and it leaks!  I believe leaking is the curse of the Rowenta.

I spent time online reading reviews and finally decided on getting one in the $20 range.  If none of them are going to last very long, at least this one won't  cost so much.


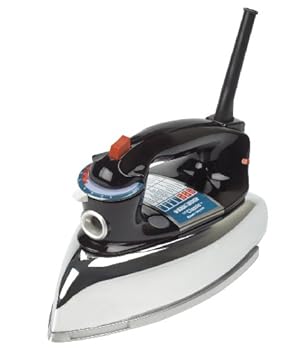
This is a Black and Decker "vintage" model.  Maybe the fact that it looks like a good, old one, it will work like a good, old one?  I ordered it online and then later when I had to run to Walmart for something else, I discovered that they carry it!  Do you remember when I disdained Walmart's selection in my first post about this?  At least I was able to see it and handle it.  The tip is maybe not as sharp as I would like, but I love that it is "weighty."  It is also slightly compact--not near as small as a travel iron, but it just feels like it will do a great job.  We'll see.  I will let you know how I like it when it arrives.

Have any of you tried this?  I'd love to hear from you.

I also sat down to email a complaint to JoAnn fabrics about the coupon not being accepted for irons when it didn't list it.  I decided the best thing to do was to list all the things they mentioned to prove that it didn't say "irons" and as I was copying, I discovered the word "irons."  I am now embarrased and despite the fact that there is a 60% off one item coupon right now, I opted not to return so quickly to my local shop!  Luckily there is another not too far away!  Needless to say, I did not send off the email.  (Open mouth, insert foot.)

The lessons learned in this process are so many:
1.  Don't go out when the POTUS is about.
2.  Perhaps you should try the closest store first.
3.  Read the fine print on the coupon CAREFULLY
4.  The more expensive options aren't necessarily the best

And perhaps more important:

5.  Sometimes mundane tasks make for entertaining blog posts.

Have a great day!

JoAnne

Friday, October 19, 2012

Quilty Coincidence

Hi All,

First off, I would like to share a quote:

 To the President of the Continental Congress, October 19, 1781

"I have the honor to inform Congress, that a reduction of the British Army under Command of Lord Cornwallis, is most happily effected."                            --General George Washington

231 years ago, Cornwallis surrendered during the Battle of  Yorktown, leading to the Treaty of Paris, the end of the Revolutionary War.

Besides being The Patriotic Quilter, I now live in Yorktown and there will be a parade today to celebrate and I think it is worthwhile to share this important date.

But getting back to quilting related chat, I wanted to share one more thing from my class on Sunday.  Have you seen this magazine that is out on the newstands right now?

 
 The featured quilt on the cover was designed by my instructor, Marcie Patch!  She was pretty excited to finally have a quilt on the cover of a magazine, and I must say that I can totally relate.  I can't believe how exciting it would be to be published in the first place, but a cover quilt would be a thrill.

She had copies for sale and so I got one.

 
I wanted to be able to get her to sign it.


I set the magazine to the side after I got it until I got home that night.  While I was relaxing, I read through it.  Near the end, I was a bit surprised to see a quilt that I recognized!  Last Friday was the morning meeting of our quilt guild, and we had a fantastic program by Karen DuMont.  She is from Richmond and talked about how she got into designing patterns.  She brought lots of quilts and one of them was in this magazine.  Sure enough, I saw where it was designed by her!


I thought it was a really cool coincidence--to meet two lovely, fun quilt pattern designers within three days, and then have both of them published in the same magazine!  I also thought I must have moved to the right area, where there are such fantastic, local quilters!

Have a great weekend!

JoAnne

Wednesday, October 17, 2012

Pins, Plates, PFD, and the POTUS

On Monday, I was working away in my quilting room just as I had planned.  I was not working on my Old Elegance, though, I had a project already underway on the design wall and spread all over the room, so I decided to get it finished first.  I thought it would only take a few hours or so.

Well, it pretty much took all day.  And, while I was pressing the pieced border, all of a sudden the fabric was scorched!!!

Look at that!  I looked at the iron and the lights were off.  Hmm, I think something happened to the thermostat and the heat increased and burned the whole thing out.  At any rate, I unplugged it and plan to not use it again.  I got out my travel iron and was able to finish my project.

So today my plan was to finally work on my class project, but then I remembered that I need a new iron.  Hmm.  I live right around a corner from a Walmart, but I'm not too excited about their iron choices.  Let me add here that I'm pretty picky about an iron.  One thing that I cannot live without is a sharp point.  I don't neccessarily need a Rowenta, either.  My recently defunct iron was a Sharp, and I really liked it.  I got it at Target, so I thought about heading there first.  The problem?  I had looked through the ad on Sunday and there was a LOT of cool stuff on sale this week.  I figured if I went there, I would do "other" shopping and I should try to avoid that for now. 

I remembered that JoAnn Fabrics has irons.  I have a coupon for 50% off, so I got online to look at the choices and to take notes on prices.  I also remembered seeing Rowenta irons at Tuesday Morning, and I was hopeful of finding a good deal.  So I went there first.  They didn't have a good selection.  They only had one full-sized iron and it didn't have a sharp point.  They did have a box of applique pins for 99 cents, though, and some really cute Christmas plates.  I bake lots of cookies and give them to neighbors, etc. at Christmas, so I like to find neat plates to give away with them.  I bought all four of them.

 Next I decided to drive a bit further away to go to JoAnn's.  As I was crossing the freeway, I saw a cop on the overpass.  I quickly realized what that meant!!!  The POTUS was flying out of our local airport to get himself to the debate as he had spent the weekend in Williamsburg for prep.  We got caught up in that traffic mess when he arrived on Saturday and I knew I would be in for it again.  Ugh.  Anyway, I got to JoAnn and was looking for the irons.  I passed by the solid fabrics and saw that Kona was 40% off.  I checked and they had a bolt of PFD (prepared for dye.) As it can be hard to find, I got some.  Next I found the irons, but they just have empty boxes on display--you have to ask for one when you pay.  I did so and the clerk had to go way to the back of the store to get it.  She eventually got back and I paid.  "Oh," she says, "you can't use a coupon on an iron."  Now I had considered that possibilty before I drove all the way over there.  Nowhere on it did it say you couldn't use it on an iron.  It did list a number of other things, like Accucut, Simplicity machines, etc.  I pointed this out.  She tried it, and it wouldn't accept it.  That just ticks me off!  So I paid for the fabric only and left.

Air Force One at the local airport today
By the way, in case you don't know, POTUS=President Of The United States
Oh, and this is not my photo.  I didn't get anywhere close to the area.

 
This photo is mine.  I took it Saturday.  I told you we were in the thick of it--at Lowes--it is right across from the airport.


As I was leaving, I had to take into account the fact that I couldn't go directly home, because of the motorcade, etc., so I headed on a slightly roundabout way home.  It is a way I don't often go, and I realized that if I went a bit further, I could go to one of the local quilt shops that I haven't yet visited.  It is also the Bernina dealer and I did need some #80 needles, so I went.  What a great shop!  It is the best in the area that I have visited so far.  I got the needles, and only the needles, and left.  Now it was lunch time, so I hit a drive-through.  I'm getting tired and I still don't have a blasted iron!!! 

After considering my options, I decided to go to Target.  They had a nice selection, including Rowenta, Sharp, and some others.  One Rowenta was marked down $10 from $65 to $55.  I was leery of getting another Sharp, so I got the sale Rowenta.  Then I checked out the lamps that were on sale, but didn't find one that I loved.  I did get a bag of Honey Crisp apples, though.  We are seriously addicted to them and they are getting hard to find.

I got home after one.  I spent the whole morning traveling all over trying to buy an iron.  If I had just stayed home and ordered one online, I could have avoided pins, plates, PFD, the President, needles, and apples.  Shipping charges don't seem so high anymore!  It is also not lost on me that if I had just got to Target first, I could have avoided the other purchases AND the traffic mess.  Oh well.  Live and learn!

Have a great day!
JoAnne

Tuesday, October 16, 2012

Marcie's Quilts

Greetings!

I am back today with the promised post about Marcie Patch's quilts.  (Don't you just love that she is a quilter and her last name is Patch!!!)  If you remember, she was the instructor and pattern designer for the Old Elegance class that I took on Sunday.  If you are interested in any of these patterns you can find them here at her website.  Just so you know, she didn't ask me to share these patterns and links, however, I have never seen her patterns before and I fell in love with them because they are exactly my style!  (Scrappy)  I thought you may like to see them for yourselves.  Sometimes I have a hard time finding a pattern that I really want to do AND that will work with my stash--and these really fit the bill.  I wanted to buy them all, but I restrained myself with a few.  If I remember, I will mention the ones I bought as I show the photos.

 
This is Marcie holding up some of her quilts.  If I was really organized, I would have the names for you, but I don't.  Sorry.

 
I'm loving the birds in these three quilts so far.


Can you see the buttons in the one above?  I love it!


Do you recognize that stitchery from a fabric that was out a while ago?  If you don't have it, Marcie has included a pattern that you can use to stitch a real version, or you could use any small "panel" of fabric that you like to make a small quilt.


This is one pattern that I got.  All of these quilts are all made using my favorite techniques:  half square triangles, nine patch, flying geese, etc.

 This is Old Soul, and the pattern can be found in the Spring 2012 issue of Primitive Quilts and Projects.

As I looked closely at the quilts, I saw lots of the same fabrics that I have!

This is Pinfeathers, and it is a new pattern.  I got this one, too.  She calls it Pinfeathers because of the flying geese units!


Diamond in the Rough is another pattern that came home with me.  I have immediate plans for this one!  Once my "plate is clear" so to speak.


This cheddar quilt has a really neat border.  I thought of you, Regan, when I saw this one!!!


I really agonized about getting this one.  I wanted it, but already had a stack.  I can always get it later, though.  One lady who came in the room said that her Bee was making this.  One of the members figured out how to divide everything up and then they all went shopping together to buy the fabric and then they cut it up and shared it with each other.  What a fun project!  Also, as Marcie pointed out, this could be a really masculine pattern if you need to make a quilt for a male in your life.  I love it because it has stars and stripes!!!!!  I can so see this in red, white, and blue. (Of course, I'm just seeing that now--I should have thought of that on Sunday!!!  I'm now kicking myself...)
 
 
More about my progress tomorrow!  Have a great day!
 
JoAnne

Monday, October 15, 2012

Old Elegance Class

Good Morning,

I spent some time last week prepping for my Old Elegance class that was held yesterday (Sunday.)  There was a list of cutting instructions that really helped us get underway quickly.  The class was scheduled to go from 9-6.  I arrived around 8:30 to get set up and then to have a chance for a quick perusal in the vending area.  Gads!!!  I wasn't tempted by the quilting things, but there was a lady who along with her husband, make handmade shaker boxes!  First off, I love any hand-crafted wood pieces, secondly--I LOVE shaker boxes so much!  I spent the morning working on my project with part of my brain and trying to decide just how many of the boxes HAD to come home with me with the other part of my brain.  Luckily, the dominant part was quilting.

If you have taken an all-day class before, you probably know the routine.  We got underway with the instructor, Marcy Patch, introducing herself and then showing us how to proceed.  Most of the parts of the quilt are pretty basic:  half square triangles, four patches, etc., but the "tricky" bit was using the TriRec tools to make the "triangle in a square" points for our star blocks.  One of the ladies referred to the pieces of the block as "Peaky" and "Spike."  Do you remember Doreen Speckmann from her visits to Simply Quilts?  She was such a fun lady and I remember when I found out that she had passed away--it was such a loss to the quilting world.  Did any of you ever get to take a class from her?

The quilt constists of 2 different blocks and I was able to get 4 of the stars and 5 of the alternates done so I could get a sample of how it is going to look.


I am loving it!  I'm so glad I decided on using red.

We worked away until a bit after noon, when we broke for shopping lunch.  There were choices for lunch--we could eat at the convention center's concession stand or leave and visit a number of local restaurants.  I stayed at the venue and ordered a crab cake sandwich which was extremely delicious considering it was from a concession stand. 

I did do some shopping.  After much deliberation and agonizing, I only took this baby home with me.


I loved the wood finishes, but when it came right down to it, this blue milk-painted one was THE ONE, and so it came home with me.  I do have their business card--I mean Christmas is coming, right?

After lunch I did a bit more sewing, and then Marcy got out her quilts to show, and her patterns to look at and purchase.  Some of the other instructors were doing the same thing, so it became a bit of a social time where everyone was visiting different rooms and looking at the intructor quilts as well as everyone's class projects.  Then I started back to work and did some more cutting.

It was becoming apparent that I am spoiled by my counter-height cutting island at home.  Bending over to cut at the table was making my back hurt, and I was getting really tired, so I packed up and came home at 4.  I dumped everything in the house and rested for a bit, but finally I took it upstairs and unpacked and then started working again.  I love this project and can't wait to see it finished!

I have know for years that I won the husband lottery.  When I got home I saw that he had done all the laundry!  He said that he knew I was going to be excited about my project and that I didn't need to spend today doing it when I wanted to be up in the quilting room, working on my new project.  What a sweety!!  He was totally right, too, and that is how I plan to spend today.

I have photos of Marcy's quilts but I will share them tomorrow.  She was an awesome teacher, plus she makes my favorite type of quilts--scrappy.  I hope you can come back to see some of the quilts.  They are so inspiring!

Have a great day!  I'll be quilting!

JoAnne

Wednesday, October 10, 2012

Stitch Basics

Hi everyone!

It is Tuesday night as I'm writing this, and I just got back from quilt guild and we had the most awesome program.  Ever. 

The presentor was Al Hunt, our local Bernina technician--but hold on!  This isn't just about those machines.  He is also trained on nearly all the main brands of machines.  Not only is he a technician, but he also teaches other technicians and dealers at Bernina University.  He really knows his stuff and is a great presenter.

He shared with us exactly how a machine makes a stitch.  The only essential parts for the process are the needle, the thread, the hook (down by the bobbin) and the takeup lever.  (The takeup lever is the "arm" that goes up and down by the tension disks.  The thread is threaded through it.  On a side note, I have been hit in the forehead by it more than once while I was trying to get close enough to see something, and it really stings!)

The sewing stitch begins with the takeup lever in the highest position it can go.  As the stitch begins, the lever descends as the needle begins to lower and pierce the fabric.  As the lever descends, it plays out the thread necessary for the stitch to occur.  The needle and lever get to their lowest point in the stitch. 

(Al had a giant sewing machine needle and a thick cord that he was using as a visual aid.  I used this bodkin-thingy as a sewing machine needle.  Just pretend it looks more like one)

 
So in this photo above, my hand is acting as the fabric, and the needle has reached its lowest point in the stitch.


At that time, the needle rises just a bit to produce a loop of thread underneath the fabric.


Al had a term for this, I believe it was "loop lift."
  (Can you believe I didn't have a pen for notes or a camera???!!!!)


This loop is VERY important.  When it is formed, the hook grabs it, jerks out about 2-3 inches of thread, pulls it around the bobbin, and then the needle and lever rise up again, and the stitch is "set." 

The whole stitch process requires about 3-4 inches of thread to run in and out of the needle.  You don't really see that happening, but if you want to see an example, thread your machine with light thread, touch a black sharpie to the thread to make a mark at the spot where the thread comes out of your machine and heads to the needle.  Then turn the wheel by hand an observe how much that dot goes down  through the fabric and back up.  If you keep making stitches until the black dot finally appears on the fabric, you will see that you probably (depending on stitch length) made at least 20 stitches, if not more.

Why do we care about that?  With that much thread needing to move easily back and forth though the fabric, and not get hung up in the process, the size and type of needle selected becomes VERY important.  Do you get as confused as I do about needle sizes and types? 
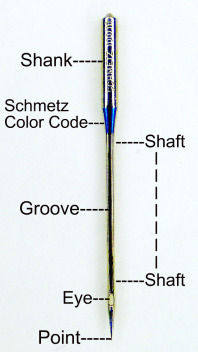

The basic features of a needle are illustrated in the photo.  There is a groove that runs down the needle, providing a channel for the thread to travel through.  And then there is the eye, which is always somewhat elongated (taller than it is wide), and then the point.

The needle size (70, 80, 90, etc. or else 12, 14, 16, etc.) relates to the thickness of the shaft of the needle and relates also to the size of the groove.  So a 100 needle is thicker than an 80 needle, and the groove for the thread is larger.  If you are using a very fine thread, you would want the smaller groove.  If you are using a coarser, thicker thread, you will want to use a larger needle.    If you are in doubt, err on the groove being a bit larger than too small.  If it is too small, the thread won't be protected and will tend to shred.   Many of us worry that a large needle with make larger holes, and we don't want that, but really, once the quilt or fabric is manipulated, the holes will not remain (unless you are using a fusible or something.)

The point is another consideration.  There are three main types, the "sharp" which as it name suggests is very sharp and will pierce through fibers, thread, etc.  A"ballpoint" needle is more rounded, and works by pushing between the weave of the fabric, not piercing through it.  And finally, the "universal" which is in between the other two.  As you sew with the universal, it will go through most things, but also not pierce right through.  A ballpoint is usually used with knits, because a sharp will rip holes in knit and the ballpoint also becoming popular with embroidery machiness because it will go down between the threads, and not right into the other thread as a sharp may.  Have you ever been free motion quilting and the needle went right through the thread of the previous stitch?  Probably you are using a "sharp" needle and the result is that the thread snaps.  His recommendation for most sewing is to use a universal.  (The exception being knits.)  The universal needles are cheaper, too!

Finally we get to the eye of the needle.  The eye variations create types of needles like "top stitch", "metallic", etc.  In a "top stitch" needle, the eye is quite large.  It was designed so that a thicker thread could more easily pass through the eye, but when designed, the needle was used just for topstiching with a thicker thread, and not in a freemotion situtation.  The problem with using a needle with too large of an eye is that the loop formed in the "loop lift" will not be as large and pronounced, and much more difficult for the hook to catch.  The result is skipped stitches.  (This was an "ah ha!"moment for me.)  Al shared an example of how he had set up several machines for a class at Bernina University.  The instructor replaced all the needles with top stitch needles and as the class got underway, he got an urgent call that the machines were acting up.  He got there and found two other technicians, messing with all the adjustments on the machines.  Al looked at the needle, replaced them with standard needles, and the machines worked wonderfully.

I have personally attended a class where the instructor was expounding the virtues of the top stitch needle.  I was so convinced that I nearly got rid of all my others!  Obviously, there is a lot of conflicting information out there.  I have been having some problems with skipped stitches, though, so I'm going to start using the standard needles more.  (Again, they are cheaper!)

Other tips we learned:

*  Al said that if you are using a quality thread and still getting a lot of lint, maybe the eye of the needle is a little too small. 

*  He also talked about how using feed dogs differs from freemotion.  When you use feed dogs, the needle comes down, makes the stitch and then the feed dogs move the fabric.  Then the next stitch is made.  The important fact is that when the needle enters the fabric, the fabric is stationary.  When you freemotion, the fabric is not stationary.  When the needle punctures moving fabric, there can be deflection.  To help counteract that deflection, he advises using a larger needle.  So he recommends a 90 if you are really good with your technique.  If you struggle a bit, he suggests a 100.

*  The more you have constricting the needle, the larger the groove needs to be to protect the thread.  So the more layers you have of fabric/interfacing/batting/piping/other seams, etc., then the larger the needle you need.  With few exceptions, the size of the needle determines the size of the groove.

*  Changing needles:  there are a lot of "rules" out there about how long you should sew with a needle before changing (and throwing it out!!) it to a new one.  The paperwork we were given tonight suggests that you change the needle every 4-6 hours of stitching.  Al thought this could be a bit conservative.  His advice:  If you can't remember the last time you changed your neede, go ahead and do so!

I hope you find some of this information to be helpful and that it is understandable.  I experienced several "ah ha" moments and found all the information very illuminating.  I guess I didn't even know exactly how a machine makes the stitch.  Now that I know the basics, I can be more effective in  troubleshooting when I'm having a problem (in my case, it is usually skipped stitches.)

Have a great day!
JoAnne

Sunday, October 7, 2012

Today is the day

It is raining and only 55 degrees out, so today is the day. 


Yep, long pants, shoes, and socks.

Thursday, October 4, 2012

Lately

Yesterday was the second meeting of the bee I am now attending.  I had a really good time.  At the first one, I was working on appliqueing my Sarah's Revival blocks and the ladies were impressed so they asked me to teach my back-basting applique method at yesterday's meeting.  I did and they did great.  Many more ladies attended this one than the last one--I think because "summer" is over and many who were away traveling, etc. were back.  They are such a nice group of talented quilters and they really went out of their way to make me feel welcomed!  I must say that of all the different places/organizations I have been attending, they take the cake.  I also think that I may actually know all their first names, too, but we will have to see if I remember them by the next time!

I have finished another Sarah block. I'm up to 11 completed now!  I'm not doing as well as I had hoped, but I have more blocks prepped and I'm going to keep them down by the tv so I can stitch more while I watch tv.  I basted another block last night while I watched the debate.


Our taste of fall has vanished.  Yesterday it was in the upper 80s and muggy, muggy, muggy.  I'm by no means looking forward to winter and snow, but I would really like to be able to switch off the air conditioner once and for all!

Have a great day!
JoAnne

Tuesday, October 2, 2012

Bounce Borders

So when you set out to do a new project, do you glance at the photo and start cutting?  Or do you briefly peruse the pattern and start cutting?   Or are you like me and read the whole thing from start to finish before you do anything else?  I freely admit that I'm a geek that way, but I am what I am. 

While reading the instructions for the Bounce border, I noted that Carrie mentioned that the edges may get raggedy, and if it is bothering you, you can easily trim it.  To make the border, you piece strip sets and crosscut them and then sew them randomly together.  Once again, the pattern allows for a variation--you can do all the subcutting the same width, or vary them.  I decided to vary, primarily because I knew I was resizing the quilt and I wasn't sure how the border would play out.  I thought if I have different widths of sections I could more easily fudge something if the border didn't come out exact.  I also really like the "playfulness" of the random widths of sections. 
 
So above is a completed border strip.  You can see that the segments are different widths, however, what I would like you to notice is that the edges are a bit raggedy/uneven.  It doesn't look too bad in this photo, but trust me, along the entire length of the strip, the edges were a problem.
 
So Carrie said to "trim it."  Hmmm, how was I going to do that?  I was trying to work out in my mind just how I could trim a very long border strip without it being too much trouble.  And then I remembered that I have a 4" wide ruler (that I hardly use.)  The border strip was 4.25" wide, so trimming to 4" should take care of those pesky edges without losing too much fabric.
 
 
I lined up the ruler to make sure that it was running down the center of the strip, leaving the excess bits on each side.
 
 
I also was careful to keep the straight edge of the ruler or one of the lines oriented over a seam, so the whole thing didn't go wonky. 
 
 
Then it was just a matter of trimming one side.  (Hint:  do this on a table or counter where you can access your cutting from both sides, so you don't have to move everything to cut the other side.  Just walk around to the other side of the table.)
 
Here I am on the other side of the ruler.  You can see the tail on the left of the first side that I cut.  Now I will cut the excess away on the right side.  (I'm right handed)
 
 
Once both sides were trimmed, I picked up the ruler to move it further down the border, again taking care to line up the ruler lines with the segment's seam allowances.


Another important hint is to be careful as you are working your way down the length of border that you don't let the rotary cutter run off the edge of the ruler.  I learned this one the hard way, but luckily my oops wasn't too bad...
 
 
This is what can happen if you aren't careful!
 
Once it is finished, it looks so great with the clean edges! 


 It left behind quite a pile on my mat, though.


So if you do trim you borders, you have to adjust the size of the corner square from 4.25 to 4".  That was a really easy correction to make and it made for much easier piecing.
 
I hope this helps you if you are working on Bounce.  The four inch wide ruler was a lifesaver.
 
Have a great day,
JoAnne